
How I Made a Game Dialogue System Better than Anything I Could Find Online

Part of a series of devlogs I’m making for the Diorama Break Kickstarter.
There’s a distinct sort of dialogue style you’ll see in a lot of RPGs and other games, where one line gradually appears after another inside a textbox, sometimes with a portrait to go along with it.
Many indie developers, then, seek to emulate this style for their own games. A very common and straightforward way one might think to do this1 is to just write every individual line of dialogue directly into their code, usually inside some sort of linear structure. Toby Fox even said he was partly inspired to create Undertale and its dialogue system after reading about “array data structures”. You can then render your textbox, and one line of dialogue at a time, showing the next line every time the player gives the input. This has a number of limitations though:
It doesn’t account for branching dialogue.
It makes it difficult to swap out lines conditionally, such as when changing the game’s language.
It forces non-programmers to dig into the code files to change dialogue.
It alone can’t account for style, like italics, text coloration, text scroll effects, and more.
It adds a lot of boilerplate code syntax that isn’t strictly necessary.
A lot of online tutorials therefore recommend you move all your dialogue into spreadsheets:

This fixes a lot of the issues above, and is a lot more “industry-standard”. In general, the idea that you should treat dialogue as a data asset that you work on separately from your code (like sprites or audio) is correct. Even if this alone can’t handle branching dialogue, being able to load and refer to dialogue as data like this makes it a lot easier to implement such a system.
However, this still isn’t great! Spreadsheets are a very general-purpose tool and weren’t exactly designed with scriptwriting in mind, and especially not interactive scriptwriting with branching paths, dialogue flags, and potentially very complex conditional behavior based on the state of a bunch of game data. They might work ok if you have all your dialogue already mapped out and ready to go, but creating and editing all that dialogue in the first place can quickly spiral into an overcomplex nightmare!
What tools, then, are more precisely engineered for the task? Well, Disco Elysium, a game with one of the most complex dialogue systems in recent memory, uses a tool called Articy:

You can glean from the screenshot that this is sort of a cross between a scriptwriting tool and a visual scripting system, allowing the devs to express branches, set flags, have conditions and jumps, define dialogue styling, and more, all from a single editor. It might take a little more legwork to get it to talk to your game code, but it seems well worth it for the resulting ease-of-use when editing. And if it seems a bit pricy or daunting, similar open-source alternatives like Twine exist.
If that sounds cool to you, Articy might be the place to end your search, and I had seriously considered giving it a shot for Diorama Break, but something about visual scripting tools has always put me off. Being able to just write out my branching dialogue in a simple text editor, same as any cinematic or theatrical scriptwriter, had been the holy grail of ergonomics for me. I wanted that. And there really didn’t seem to be a tool that came up in my research catering to me so… why not make my own?
Designing the System
Since I was looking to end up with a workflow where the bulk of dialogue “content” is just line-by-line text that can be stored and edited like any text file, I decided the right tool for the job was a markup language. That is, a language where text content lives alongside “code-like” annotations, which a renderer can use to produce a final document output. The most famous example of one is undoubtedly HTML, which determines the layout of pretty much every web page on the internet (you can press F12 right now to see the HTML behind this page!) Full disclosure, I had already experimented a bit with this sort of thing in school and for the Diorama Break prototypes, but now I was set on making something truly polished that could comfortably support me through the development of a whole JRPG.
So the basic plan was to design a language of annotations that I could add to my dialogue text to express things like branching, text style, and more. I then need to build an interpreter and renderer in my engine that can read the resulting text files and display the appropriate dialogue and choices, as well as an editor that can display these annotations in a way that’s easy to parse at a glance and edit.
One very popular markup language right now is Markdown. Lauded for its simplicity, it barely feels like a “language” at all, just a very simple set of rules you can use to write out documents with headings, images, basic text styling, and more, all by hand.

Its popularity gave it something I could spin to my advantage: a whole ecosystem of text editors that support it natively. This solved a big problem for me: rather than build a text editor from scratch with all the extra features I would need, I could use an existing Markdown text editor, write my annotations with markdown syntax, then write my interpreter in a way that it could parse that markdown into in-game dialogue, basically cutting the work in half!
For my editor of choice, I ended up going with Obsidian, since I was already familiar with it for note-taking.
To recap then, I was looking to build my markup language with these features:
Simple text as the backbone. One line of plain text in the document = one line/box of dialogue in-game.
Stylistic markup for bold, italic, and colored text.
A simple way to express nested branching dialogue with both conditional checks (“if statements”) and player dialogue choices.
Ability to jump to different points in dialogue for more complicated branching behavior.
Ability to set flags.
Ability to call arbitrary engine functions (for more complicated behavior, e.g. starting cutscenes).
Ability to set the speaker’s profile picture and have it be visible in-editor.
Here’s the syntax I ultimately settled on:
Styling
This one was a no-brainer. Markdown supports using asterisks for *italic*, **bold**, and ***bold italic*** text. Colored text was a little harder, but I ended up using an Obsidian plugin that will color the text you highlight by inserting a special HTML tag:


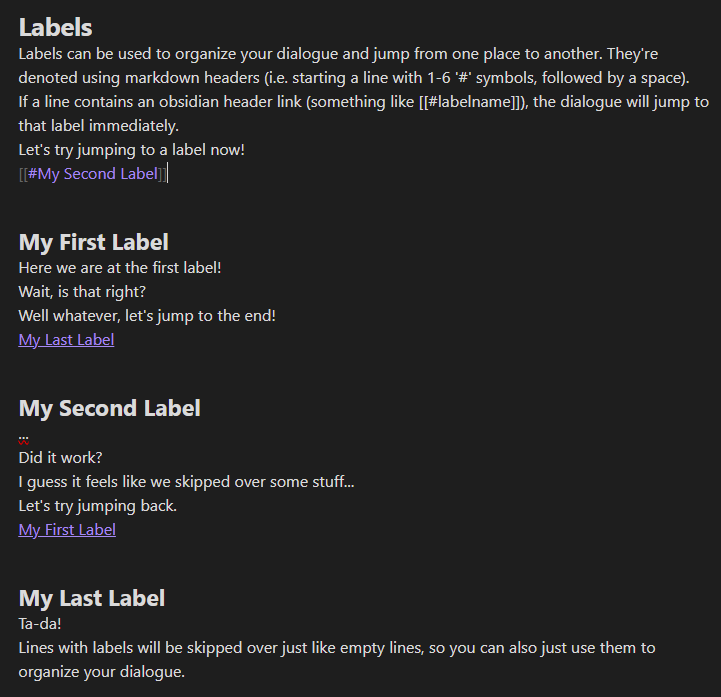
Jumps
For jumping between different points in dialogue, I decided to use Markdown headings (which I call “labels” in this context). This lets me naturally segment the file in a way that looks nice in-editor (and lets me fold up segments). By inserting a Markdown link, I can tell the dialogue to jump to a new label, and as a nice bonus I can click on said link in-editor to jump there too!
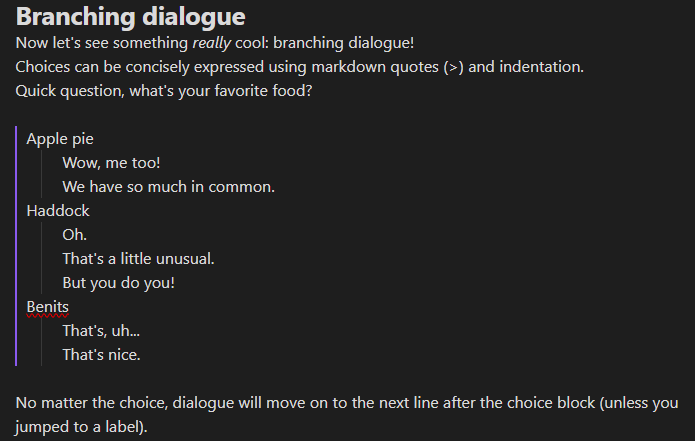
Branching Dialogue
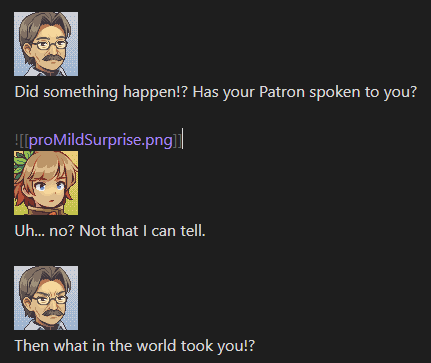
By using Markdown quote syntax, I can create a pretty nice looking “dialogue tree”. This will pop up a question box the player can use to give a response:
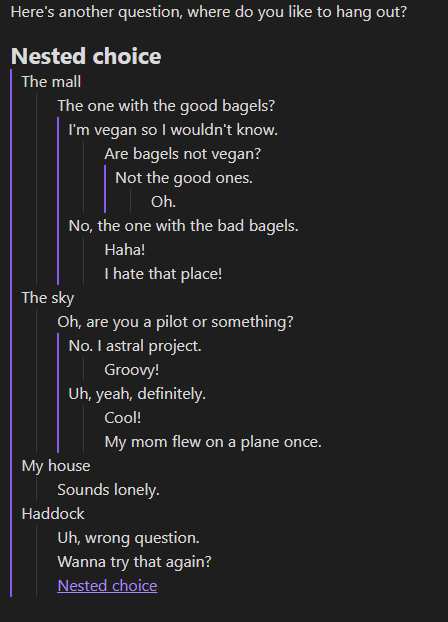
It’s even possible to nest these choices and jump to and out of them using labels:
Here’s what that looks like without Obsidian’s prettification:
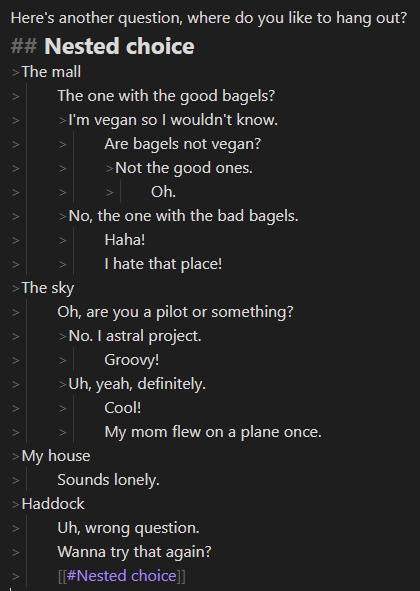
If you’ve played Diorama Break, you’ll know it also features “optional” dialogue choices, called “interjections”. I mark these just by adding a ‘!’ at the start of the first choice. If the player ignores the choice, the dialogue will just skip past the entire choice block.
Conditionals and Commands
By using Markdown’s backtick syntax, intended for showing code blocks, I can separate normal text from basic scripting logic I want to insert. The first thing this can be used for is conditional blocks (also nestable):
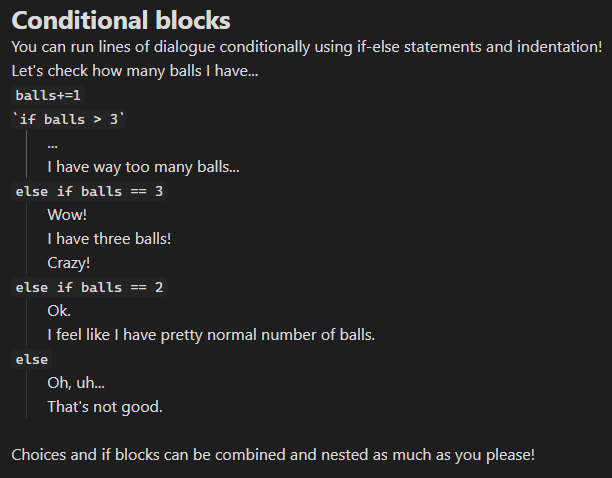
As you can see here, I can also use backtick commands to set flags.
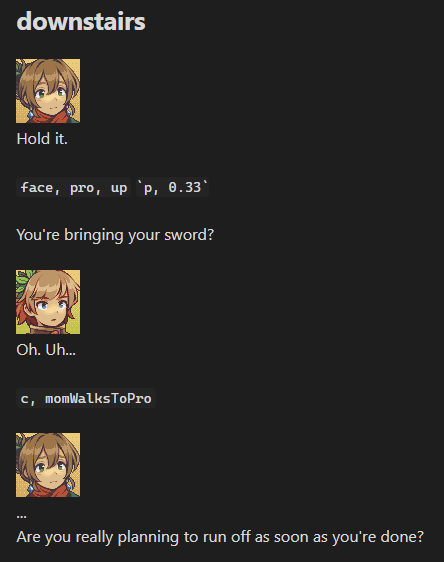
I can also call parameterized commands to the engine to do stuff like play cutscenes, adjust characters, change the dialogue speed, etc. Here’s an example from the game demo:
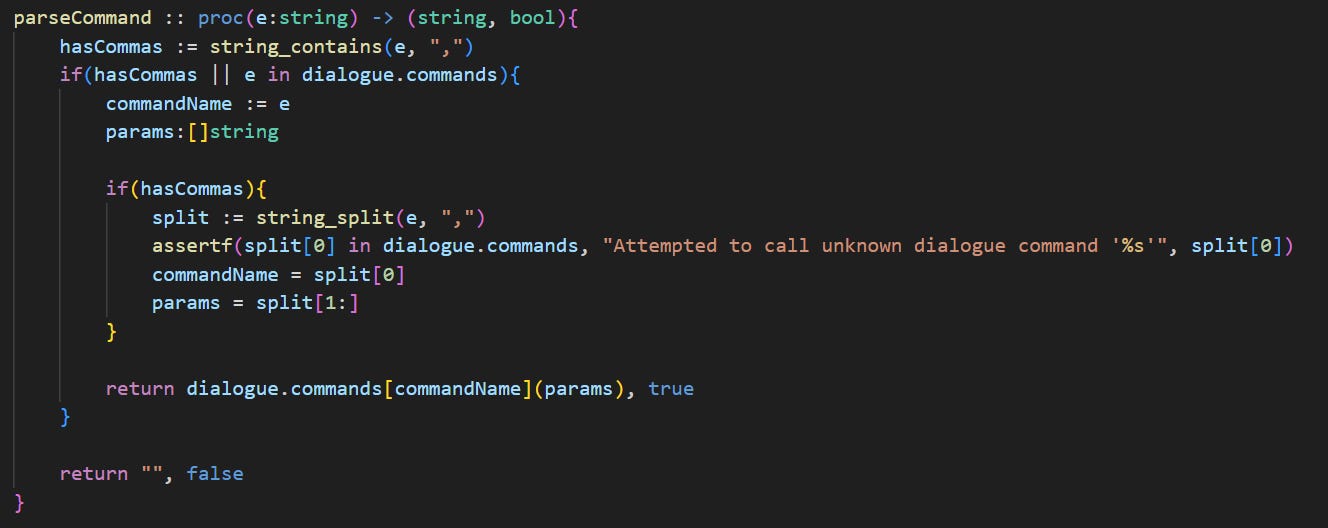
These work by calling from a predefined list of commands that interpret the parameters as an array of strings:
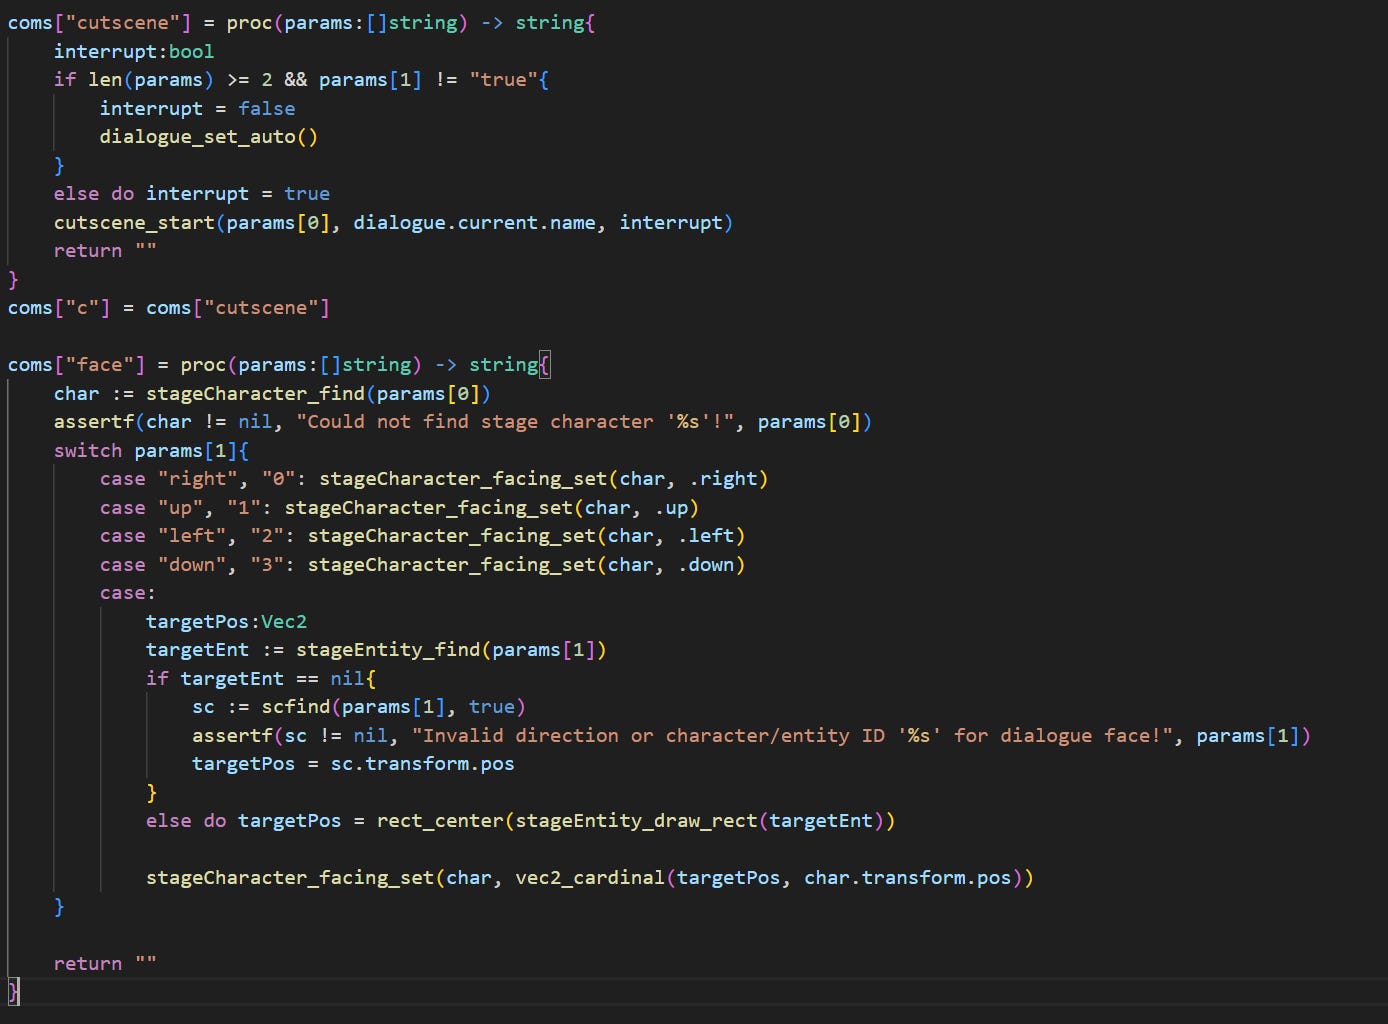
Commands return a string that can be inserted in the dialogue if need be.
Portraits
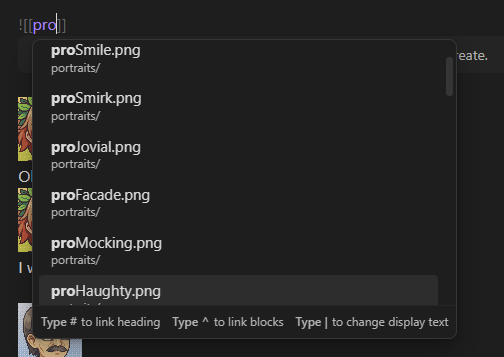
These work using obsidian’s image links. By including a symlink to the folder in our sprites directory containing all the character portraits, we can simply link the filename, which gives us a command that changes the portrait in-game and previews it in-editor:
Obsidian will even auto-suggest filenames:
Combining it All
When put all together, these features can do some pretty nifty stuff. Take a look at this example from the game:
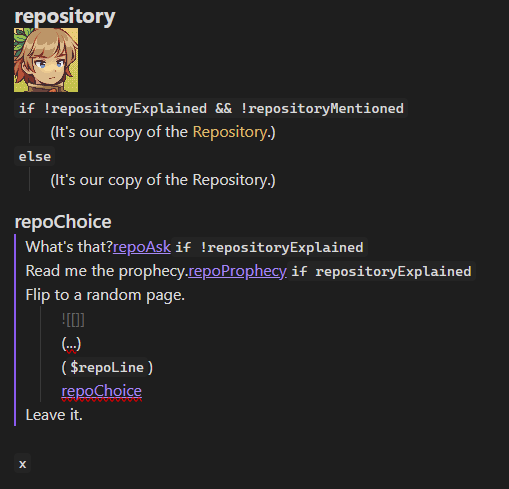
This does the following:
It can be started by (when interacting with the relevant object in the overworld) jumping to the “repository” label in the relevant dialogue file.
Sets and unsets the dialogue portrait.
Shows a differently colored line of dialogue if certain global flags are not set.
Displays a set of choices that bring you to different parts of the dialogue. Certain choices only display if a flag is set one way or another.
Inserts a random line from another special dialogue file using the
repoLinecommand.Closes the dialogue when a choice that doesn’t jump elsewhere is selected.
Designed!
And that’s how it all works in-editor!2 For most of you, I’d recommend getting off here. If you enjoyed this post, check out the latest backer update to vote on the next post’s topic! Oh, and also:
For the rest of you who might be curious about how it all works under the hood though, let’s take a peek!
Nitty-Gritty Boring Technical Details
Like most systems in-engine, the dialogue system relies on a set of global variables for state. Since only one dialogue can play at any given time, a lot of the system’s state is just stored globally:
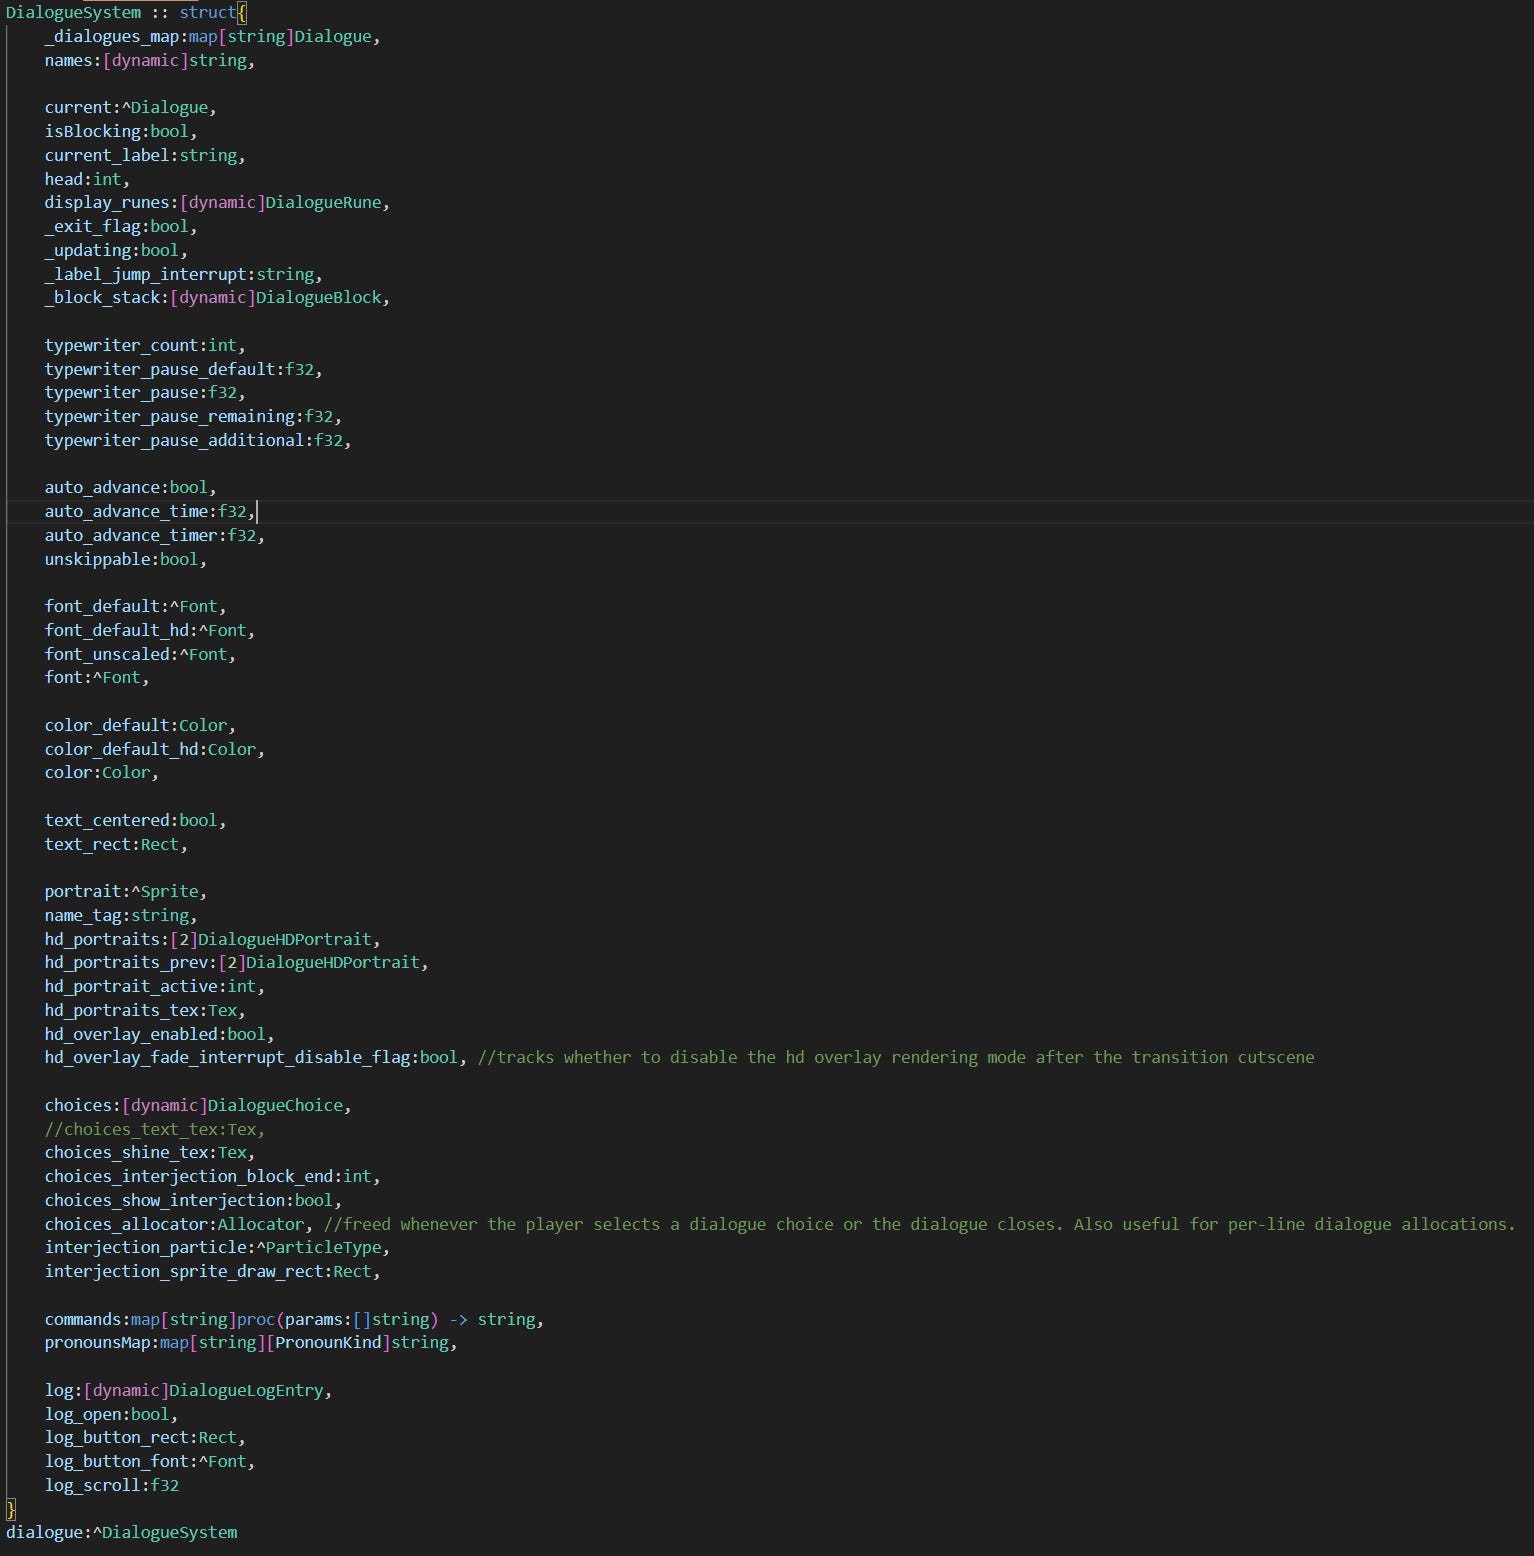
I won’t get into all the bits and bobs like HD portraits, the log, and localization, instead focusing just on how a dialogue file gets read into the engine and then interpreted at runtime.
Loading
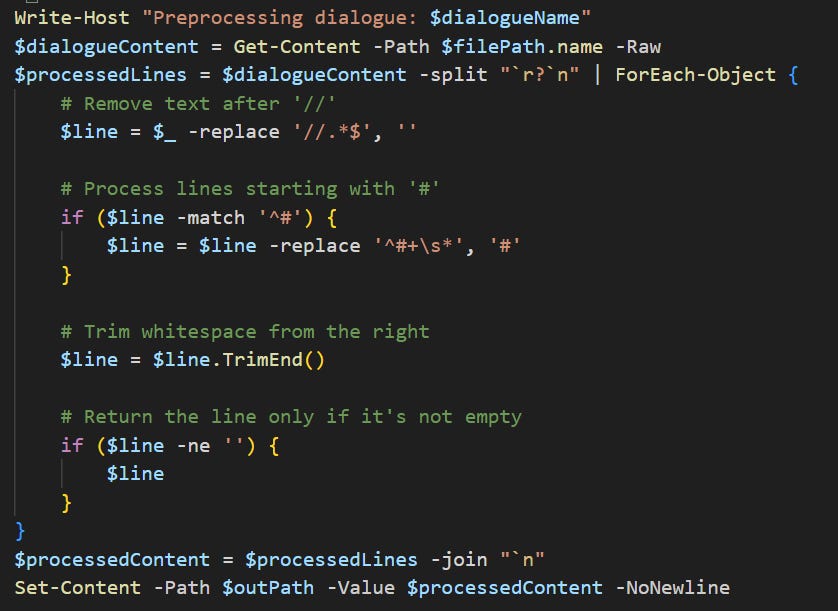
First, when building the game, the dialogue build script copies all the dialogue files and places them in a flat intermediate folder for the asset packer to bundle into the final packed asset binary. It also reads all the filenames and generates an “id” code file that my Language Server can use to provide autocomplete for dialogue assets, much like the other asset build scripts. The only unique part of this script is the preprocess step, which strips out comments, trailing whitespace, unneeded heading hash symbols, and empty lines:
At startup, the asset loader loads the dialogue data into memory and maps it out like so: each dialogue line is its own string, stored in an array, and each dialogue also gets a map that maps each label name to an index in that array.

“Running” a dialogue
At almost any point, the dialogue_open proc can be called to open a dialogue (from the top, or at a specified label).
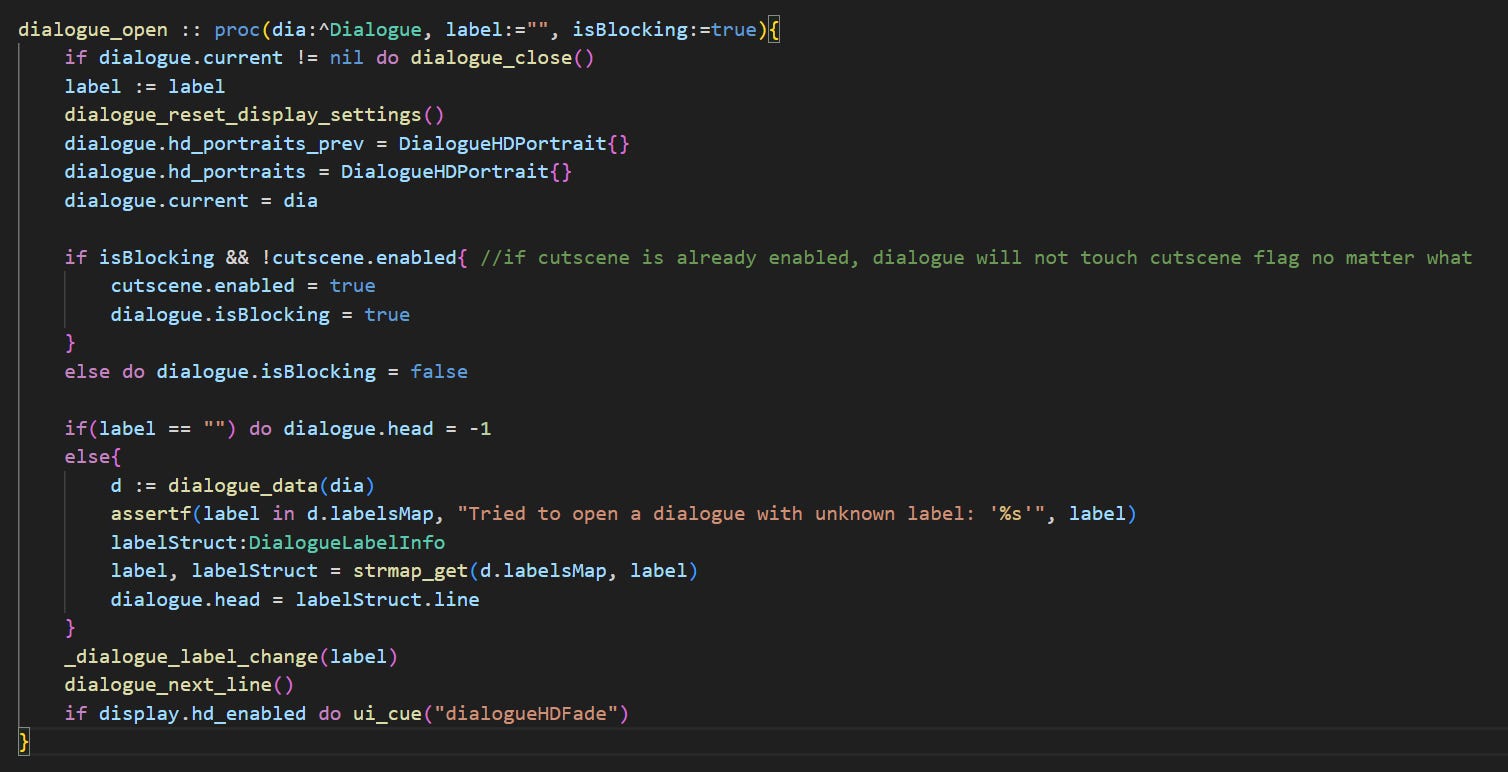
“Blocking” here refers to if activating the dialogue should prevent the player from making other inputs for its duration.
From the open proc, I call dialogue_next_line. This is a monster 200-line proc and the beating heart of the interpreter. It works on the following principle:
The dialogue system tracks its current position using a “head” (the index of the line we’re on).
Read ahead from this head in a loop until you have content that can be displayed, then stop (with a few exceptions).
Let’s look at it step-by-step:

First, it:
Ensures it’s not being called with no dialogue open.
Sets a flag that says the dialogue is currently “parsing”. This is mainly for certain label jump procedures, since they need to behave slightly differently if called from inside vs. outside the parsing loop.
Sets a “temporary head” to start reading the dialogue data.
Gets the current dialogue’s line data3.
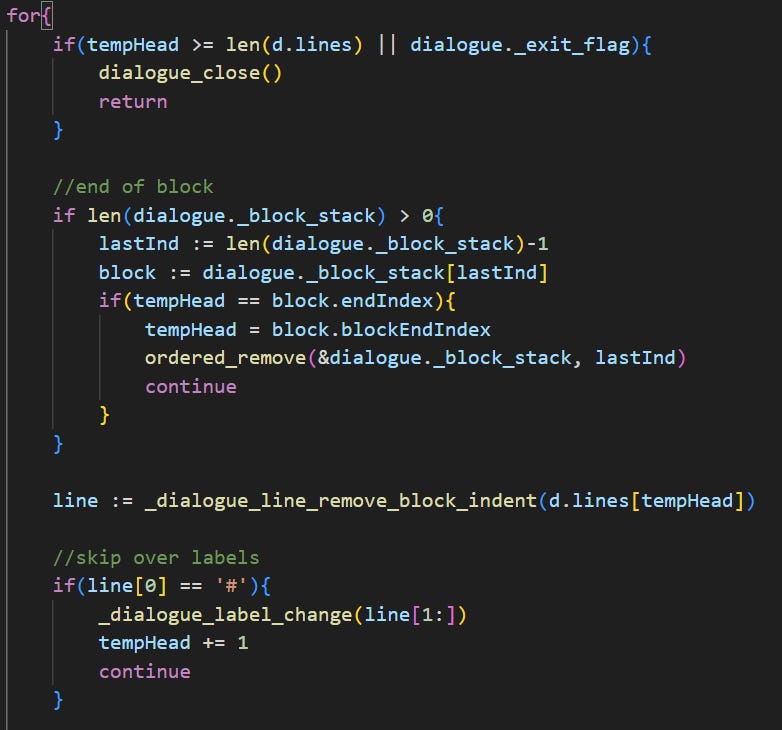
At the top of the interpreter loop, it:
Checks if it’s reached the end of the dialogue file, or if the exit flag was tripped, and if so closes the dialogue and stops the loop.
Checks if it’s reached the end of a “block”. These are used for conditionals and choices like we saw before, and stored on a stack. If it has reached the end of the current block, it pops it from the stack and sets the temp head to the appropriate point outside the block.
If inside one or more blocks, the block “indentations” (either tabs or quote arrows ‘>’) are removed from the line it’s parsing.
Labels are never rendered into dialogue, so if it hits a label, it sets some flags, then skips over it.
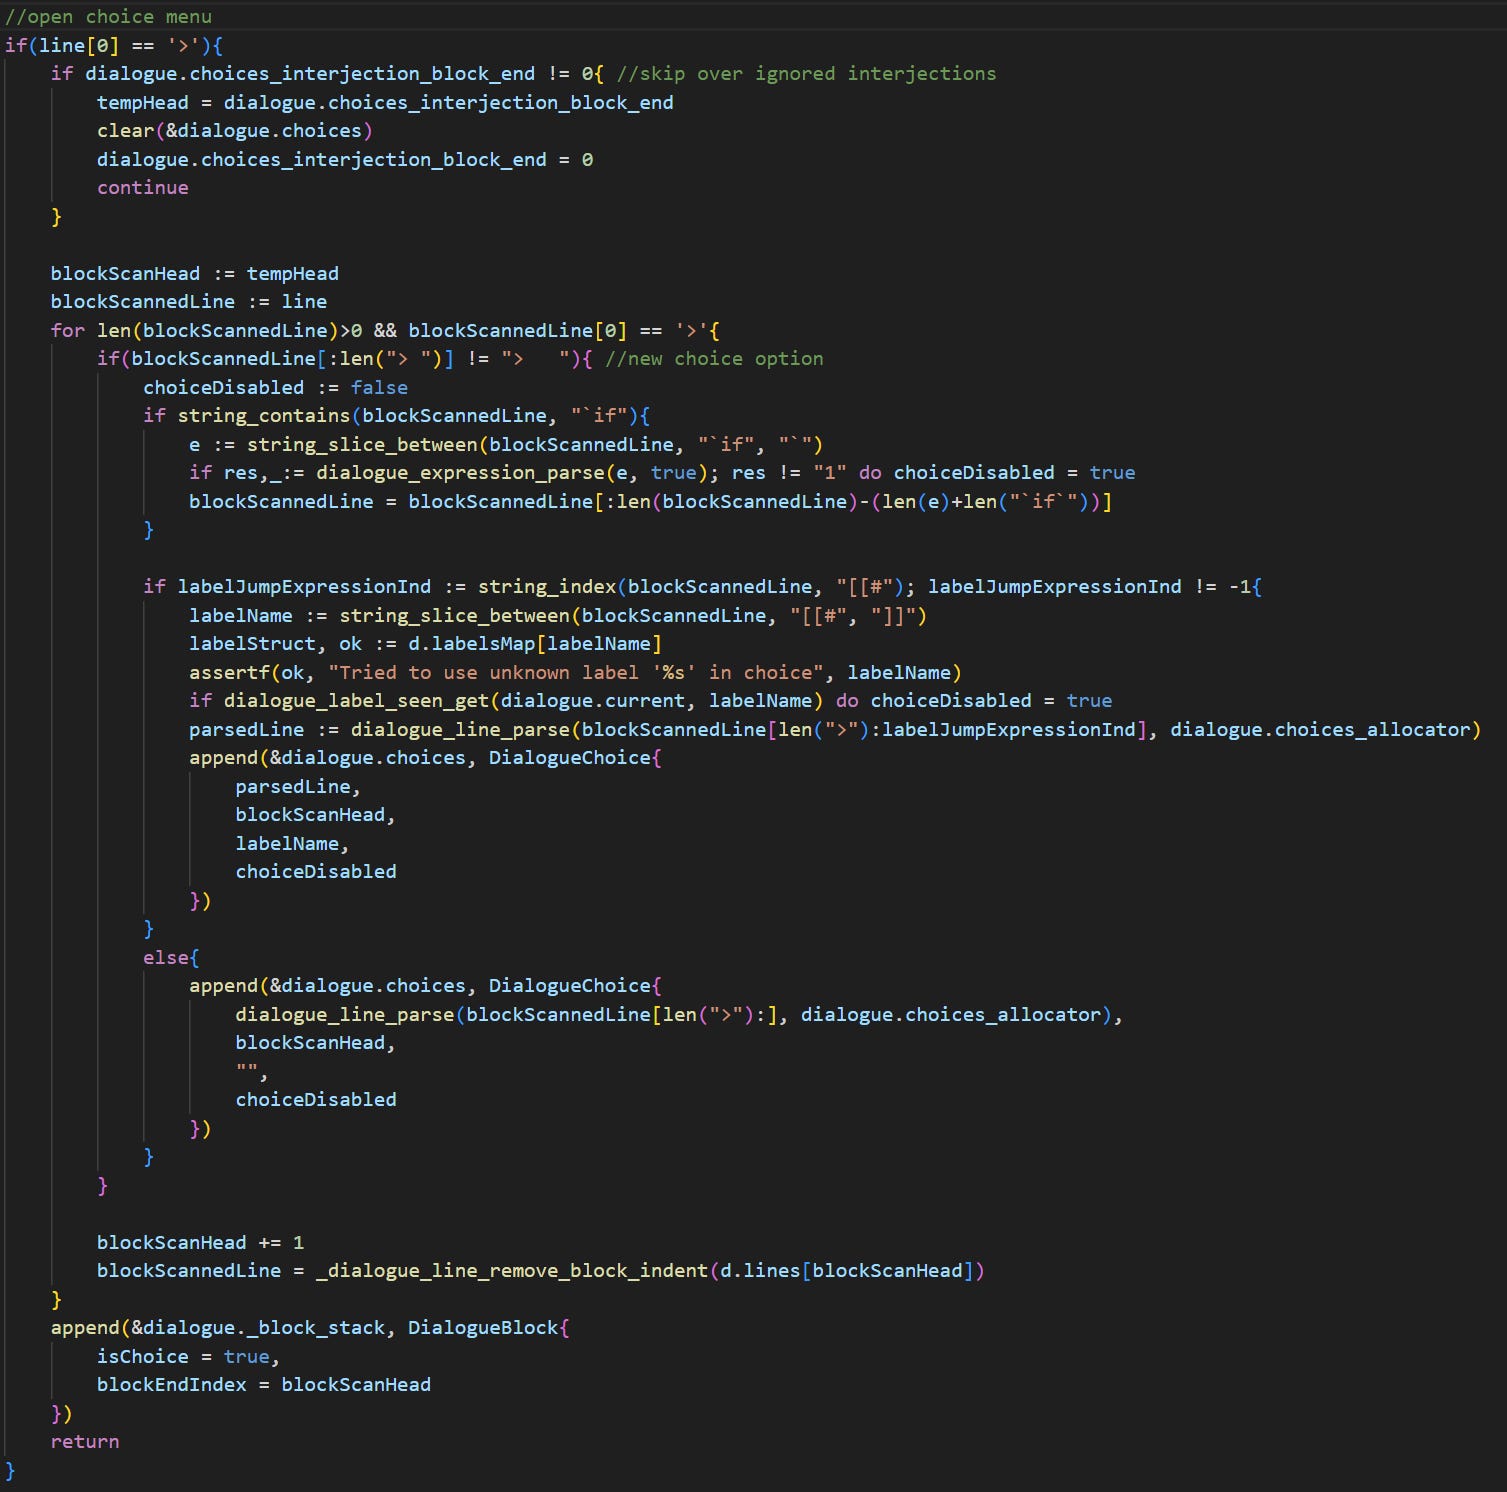
Next in the loop, it checks for choice blocks. If found, it:
Skips over interjection choice blocks the player chose to advance past.
Begins scanning the block with another temporary “head”. The entire block is read and the information is used to determine what choices are available in the choice menu, and where the block should end.
Some choices will be conditionally disabled, those expressions are parsed here and used to filter those choices out. Since the start of the next choice option is used to determine when the last choice’s block ends, it always adds every choice to the choice array, and disabled ones are just hidden in the menu.
Some choices are “labelled”. They will jump immediately to a label when selected, but get disabled if that label has already been seen.
Pushes the information about the choice block to the block stack.

After that, a quick check for label jump expressions. We don’t jump right away, instead waiting for the whole line to be parsed.
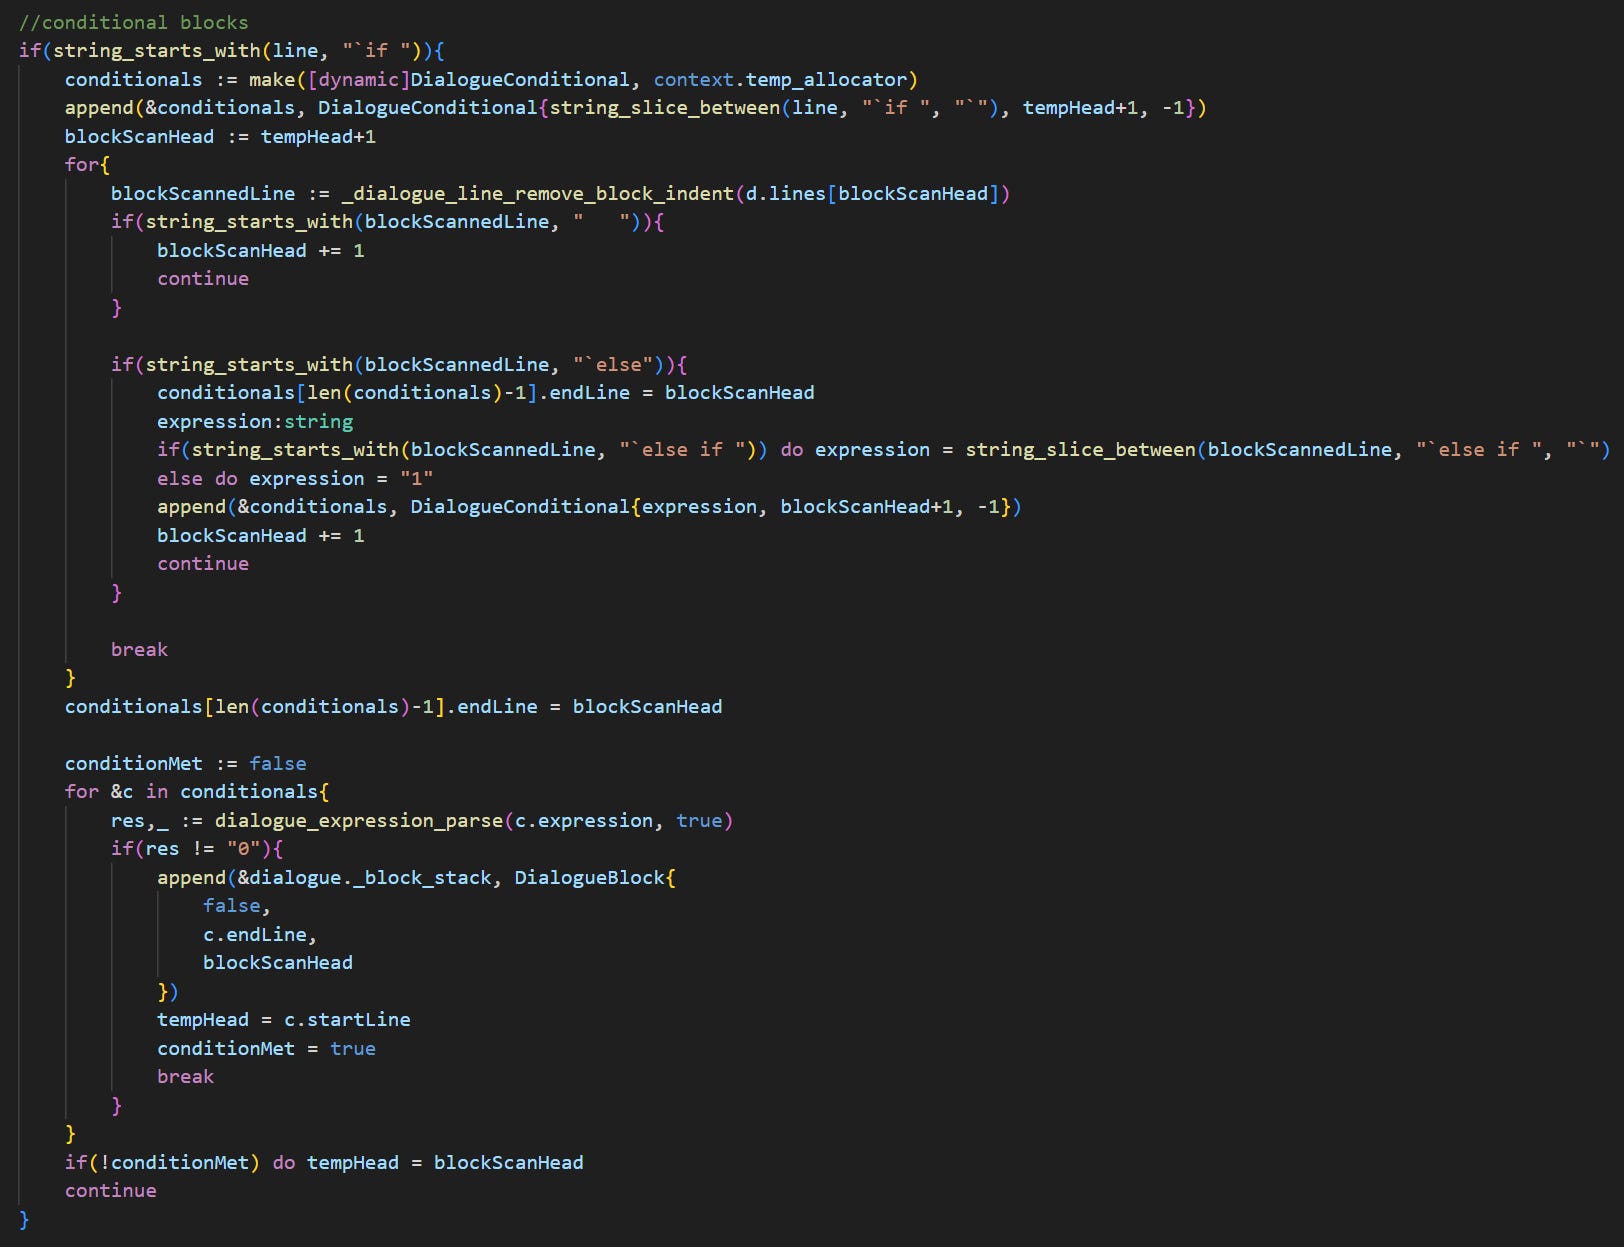
Next up, conditional blocks. These are similar to choice blocks, but without a need to wait for player input to pick a branch:
Again, the whole block is first scanned to get every conditional expression in the “if-else” chain and determine where it ends.
The conditionals are then checked in order. If any return true, the interpreter enters the block there and stops checking, otherwise the whole block is skipped over.

Next up, it parses all expressions constrained to a single line. This is stuff like styling, setting portraits, calling commands, etc. We’ll get to this later.
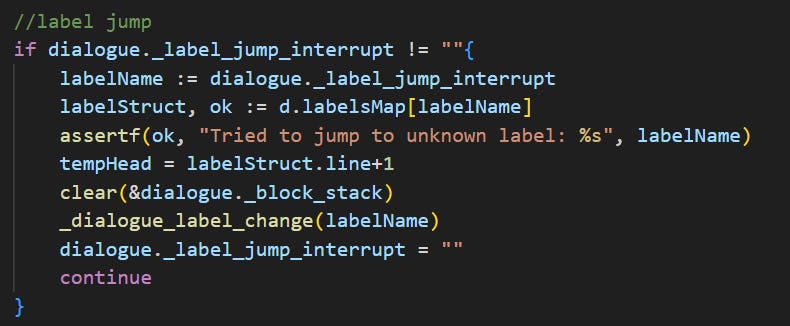
Next, it jumps to any label that was set during parsing, then continues from there. Jumps must always be to somewhere outside of a block, and so the block stack can be safely cleared here.
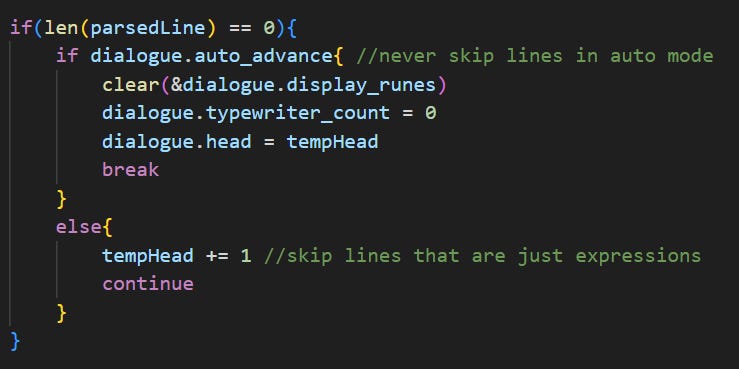
Before the last step, it checks if the parsed line is empty. If so, it continues on interpreting until it finds content to display, unless we’re in “auto-advance” mode (i.e. when the player cannot skip or advance dialogue manually).

Finally, it’s ready to display the content it parsed. For the last few things, it:
Sets the “displayed” dialogue string to the parsed line.
Dialogue uses a “typewriter count” variable to create the scrolling effect which gradually reveals the newly displayed line. If the dialogue was set to pause on the first character (“rune”) of the displayed string, sets the count to 0, which will cause the dialogue box not to be displayed for the duration of the pause.
Updates the actual dialogue head to the temporary head’s value.
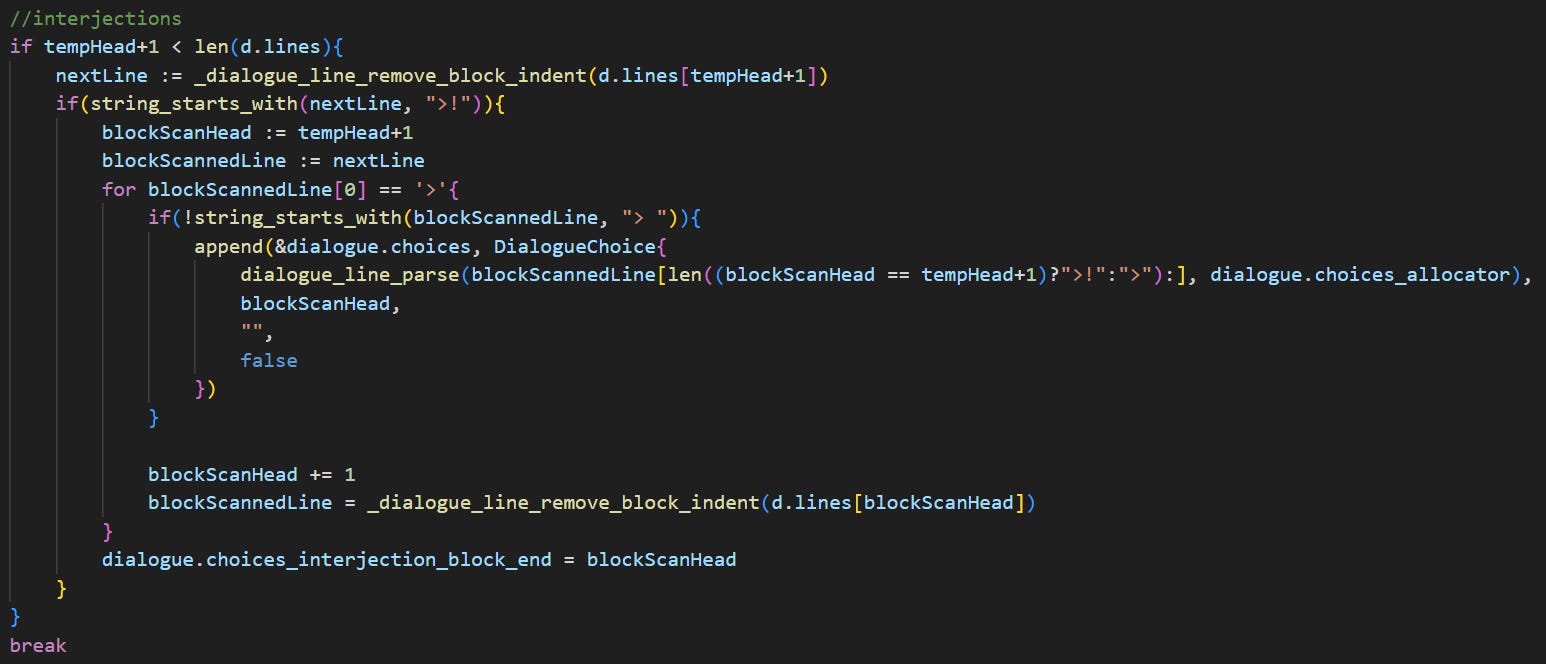
That would normally be the end of it, but the proc needs to do one last check. In order to display the prompt for interjection choices, it reads ahead a little to check if one exists, and constructs the menu.
Parsing Dialogue Lines
Rather than using the string data directly, dialogue lines get parsed into “dialogue strings”, which contain per-character metadata for styling and pauses between characters:
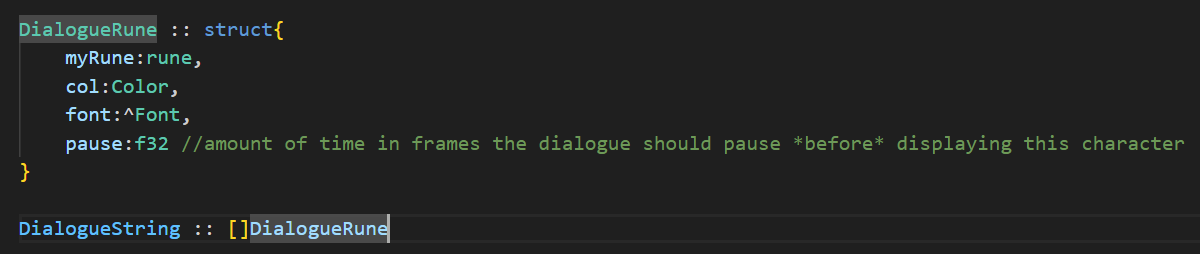
The line parsing proc takes an annotated dialogue line string, and constructs a parsed DialogueString. It can be used outside the main interpreter loop with any string, making it a useful tool in general. Let’s break it down:

First up, it makes the output array and clones in the input line in order to be able to mutate it. It’ll handle “non-positional” expressions, i.e. ones whose position inside the string doesn’t matter, before anything else.
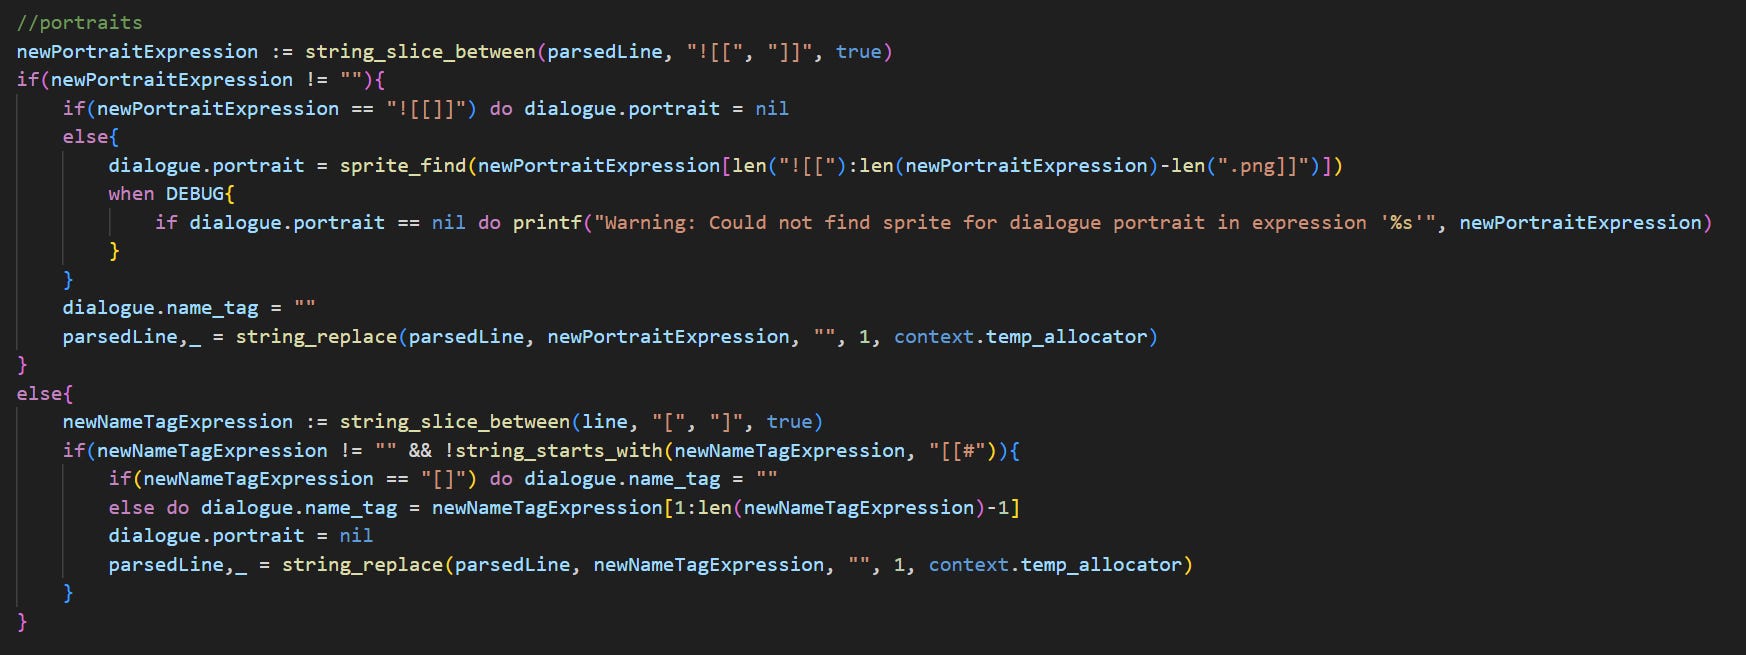
So, portrait and name tag expressions first. This simply extracts the sprite name and sets it (or sets the sprite to nothing if a blank expression is given. For name tags, the string is just extracted and set. Once these expressions are parsed, they are removed from the clone of the line that was made earlier.
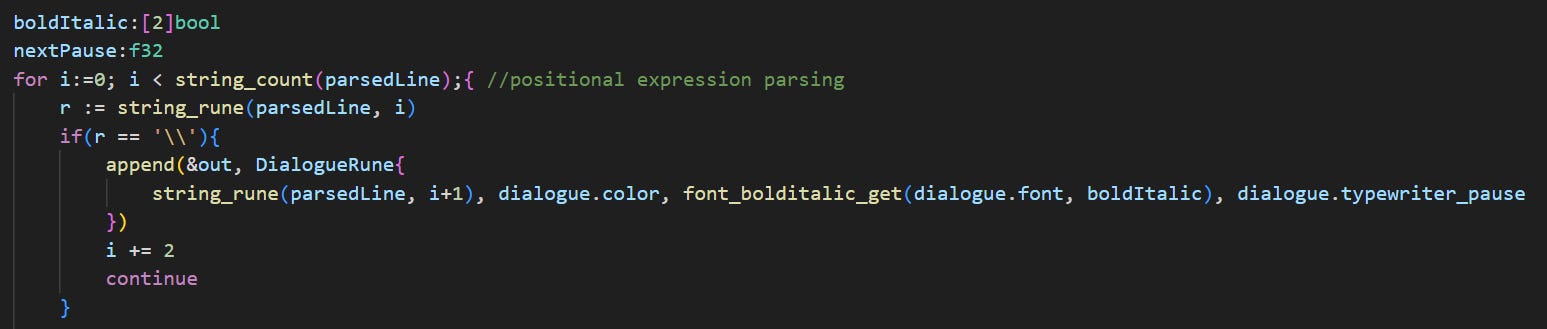
Next, it gets into the positional expression loop. This goes rune-by-rune and appends them to the final parsed output. It starts by getting the rune at the current index. The first check is simply for a backslash \, which causes the parser to treat the rune after it as a literal, appending it straight-up and not doing any parsing with it.
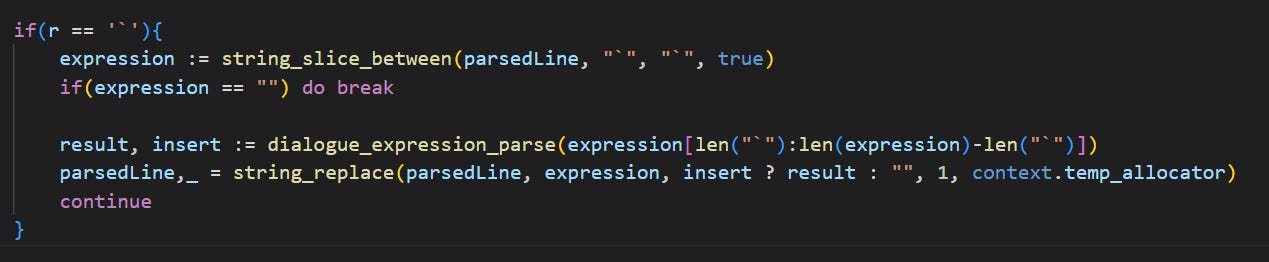
Next, since these can do anything, command parsing. These are the special custom commands we saw earlier, as well as stuff like setting flags. We’ll get to the exact way expression parsing works later.
The result of the command’s expression is inserted into the parsed line in place of the command, and the loop continues.
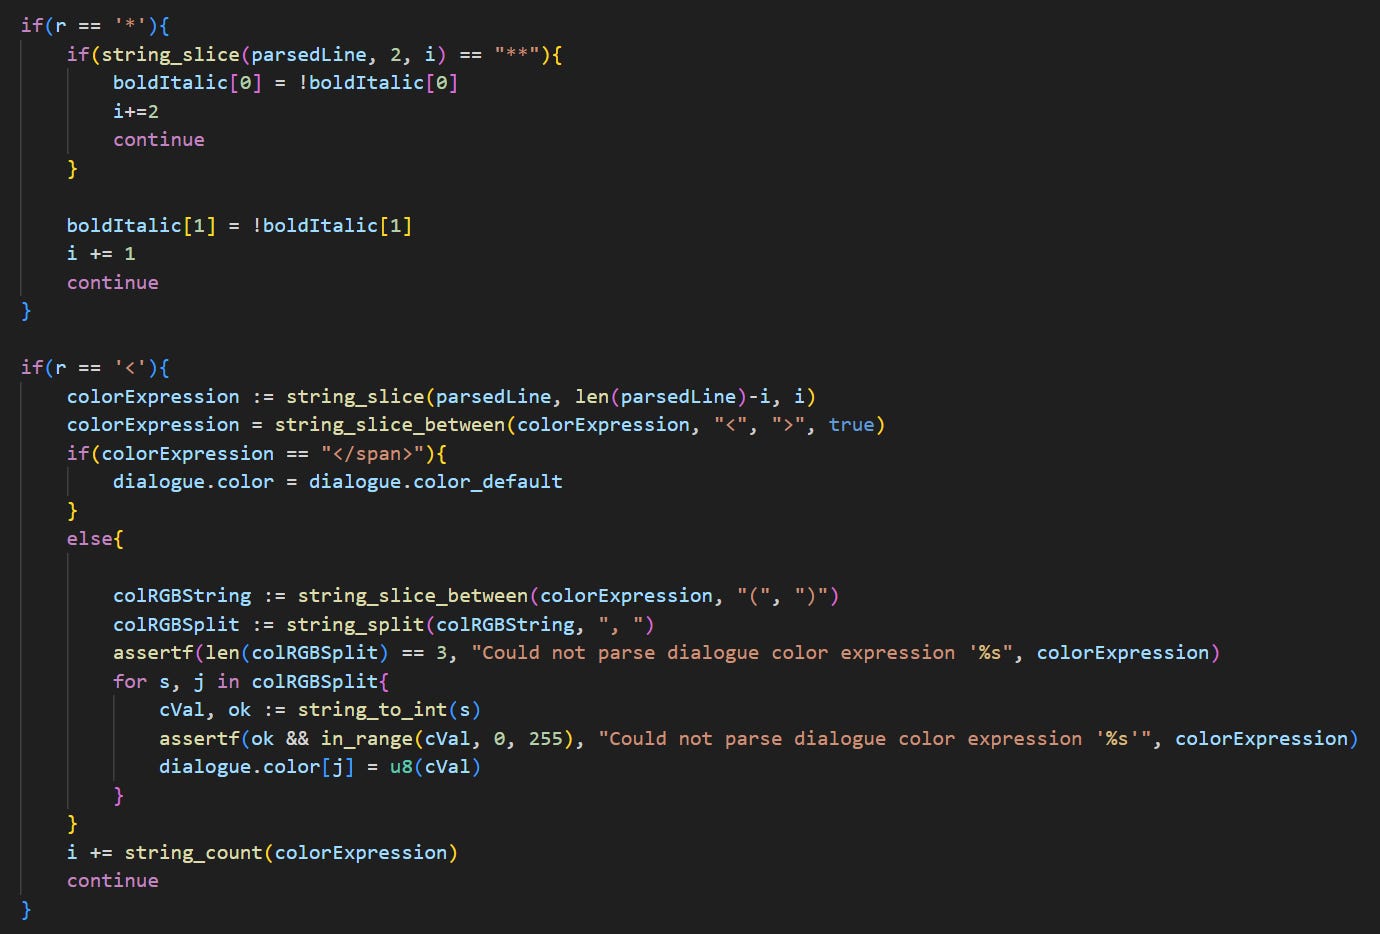
Next, some simple parsing for bold, italic, and color expressions. Values are set that all runes which get added to the output from now on read from. For expressions like this that don’t insert anything into dialogue, the parser can simply move the index to skip over them before continuing the loop.
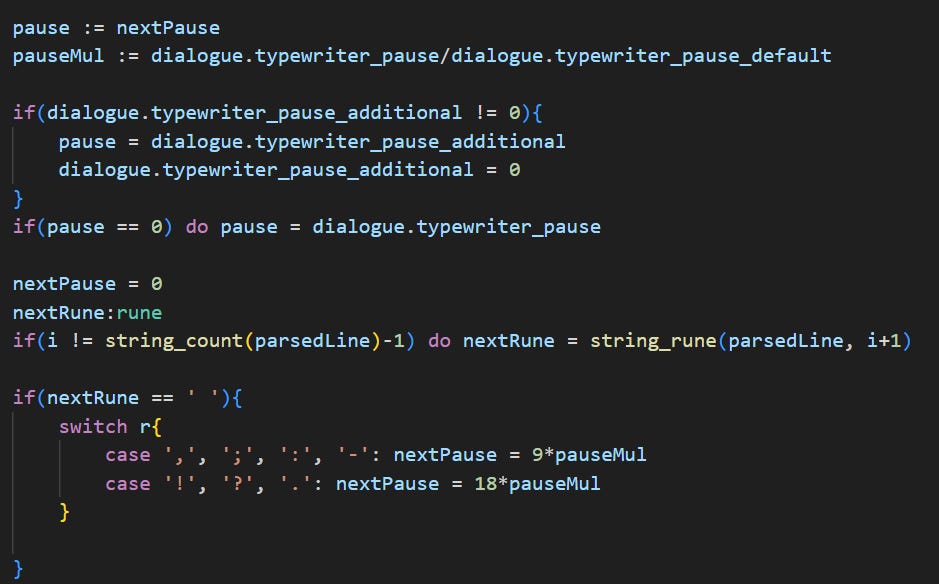
Next up, cadence. To make the dialogue scroll feel more like natural speech, the parser inserts pauses at spaces after certain sets of characters like commas or periods.

At the end of the loop, the current rune is appended to the output string, and the index is advanced by one.

Finally, once the parsing loop is done, any trailing spaces are trimmed and the output is returned.
Expression Parsing
This is the most “programming language”-like aspect of the markup language, since it’s used for simple conditionals and setting variables. It might seem quite rudimentary to some; it’s handled entirely through simple recursive calls and I’m not doing anything “proper” like constructing an AST. Partly this was to save me the trouble of learning and implementing that stuff, and partly this was a deliberate design decision to keep expressions from being able to get too complicated. If I need to express anything much more complicated than “add one to this flag” or “check if flag x is true and flag y is not true” then I should probably be writing that code in-engine and calling a custom command.
Once again, let’s break it down:
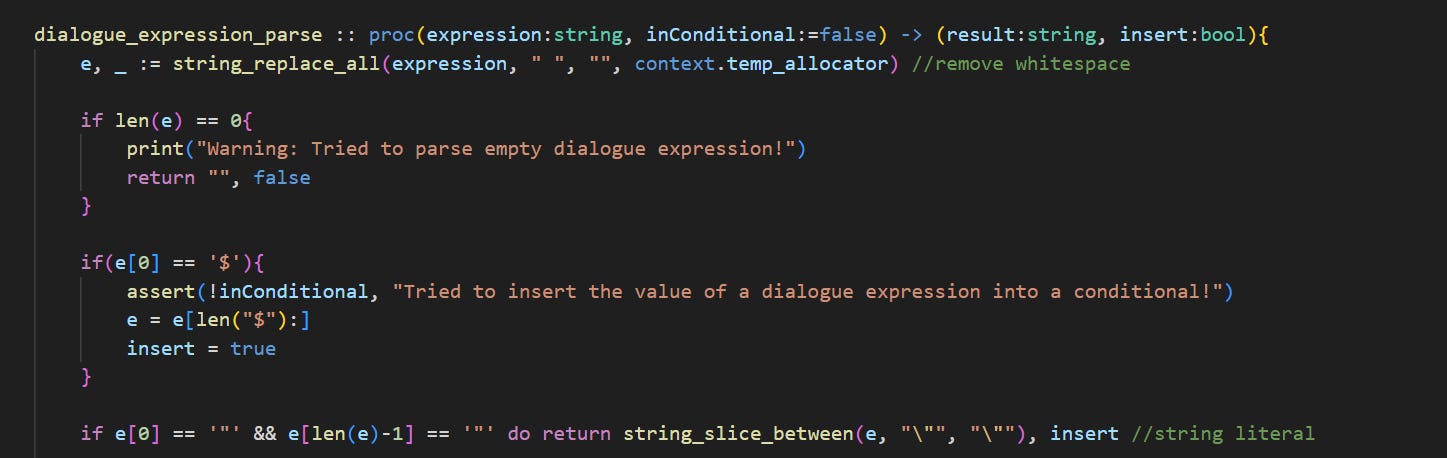
The parser starts by:
Removing whitespace.
Returning early for empty expressions.
Checking whether it should tell the interpreter receiving the result to insert it into the dialogue.
Checking whether the expression is only a string literal, in which case it just returns the contents.

Next, if the expression is a valid float, the parser returns it as-is.
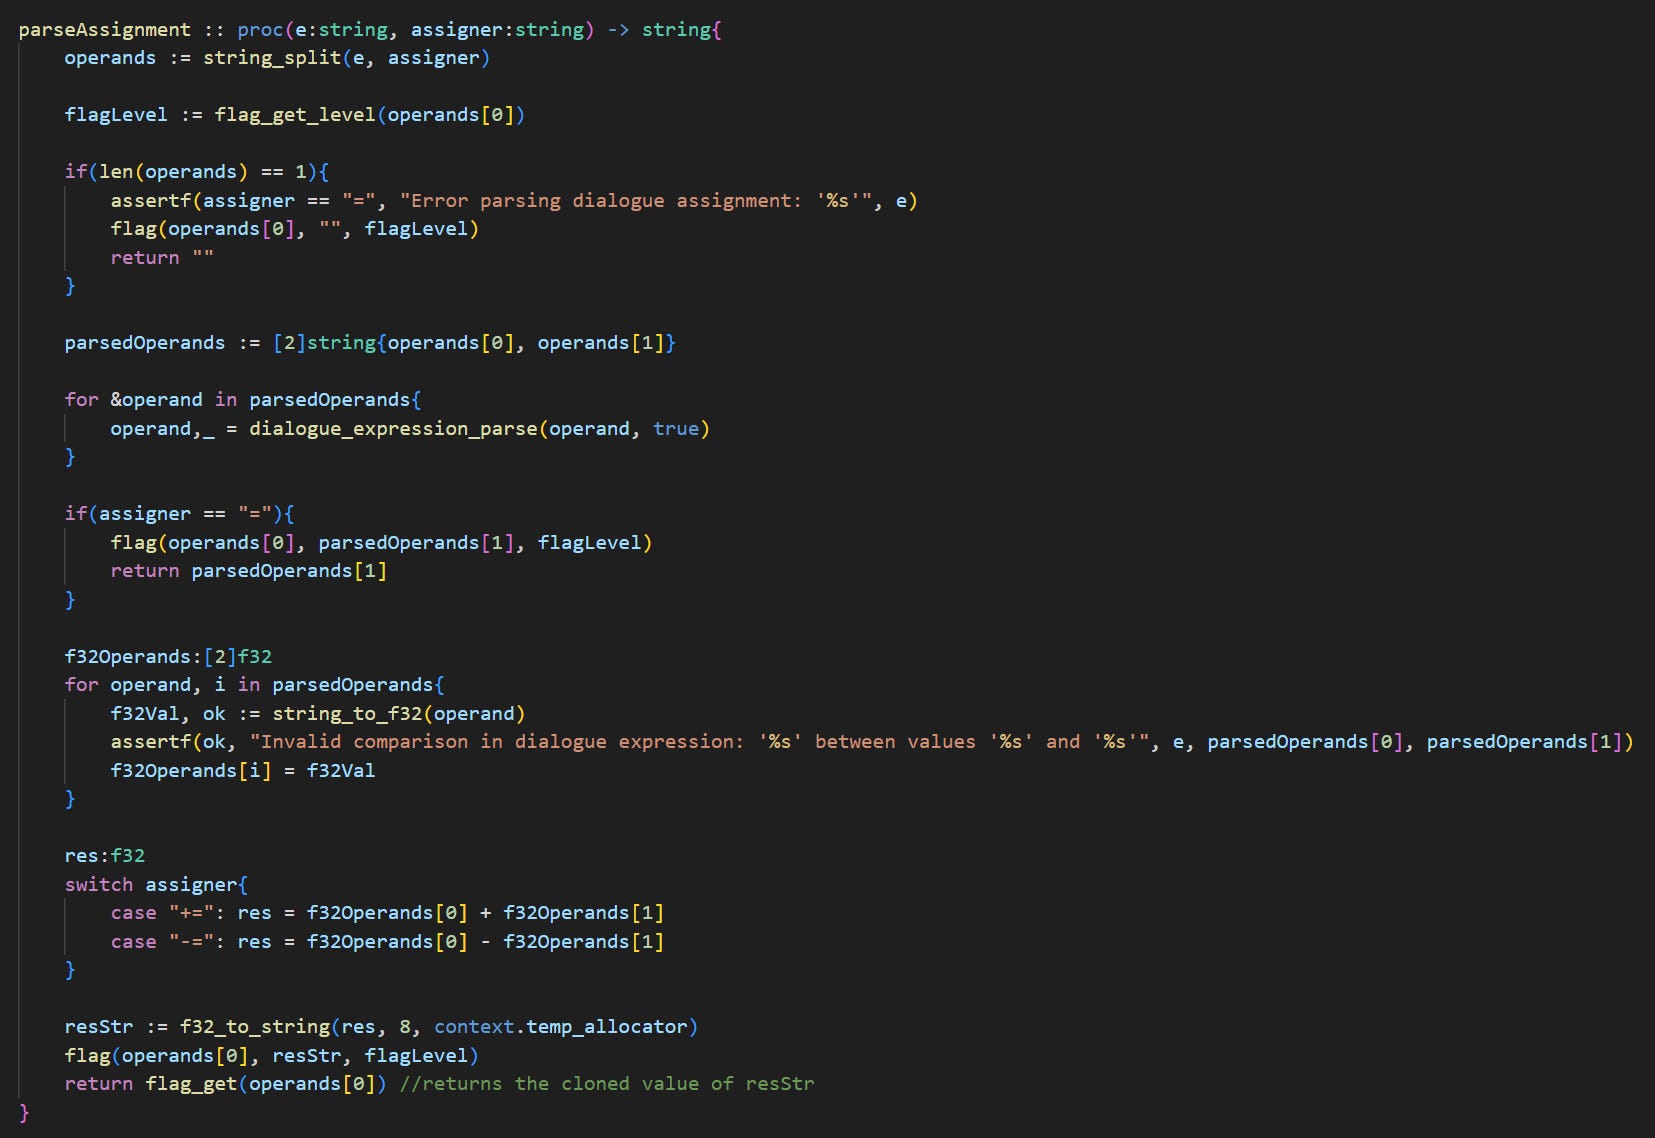
Next, if it’s not doing a conditional check, the parser checks for an assignment expression. If found, both operands are parsed individually, the result is calculated, and the new result is assigned.
I use my global flag system for variables here. It’s really just a map of flag names to string values, though if the parser can interpret these string values as numbers it will gladly do math with them here.
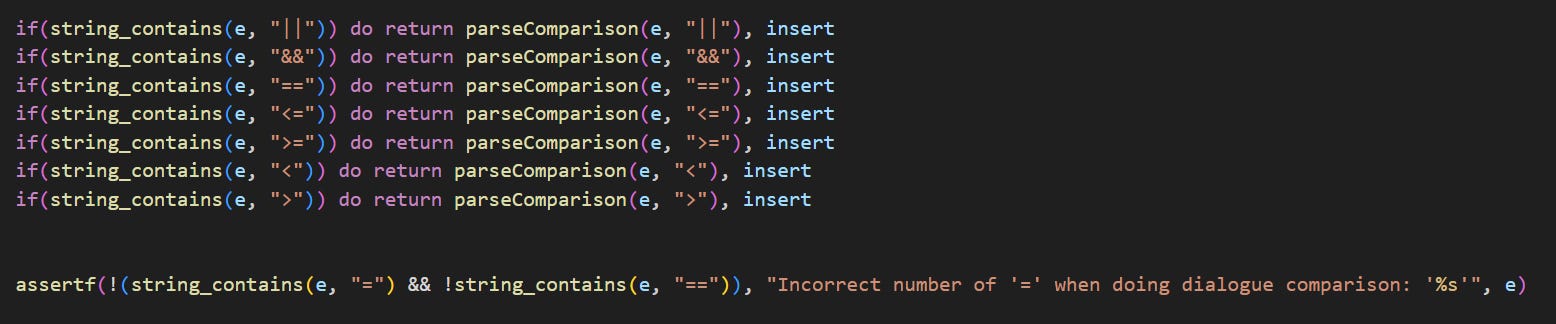
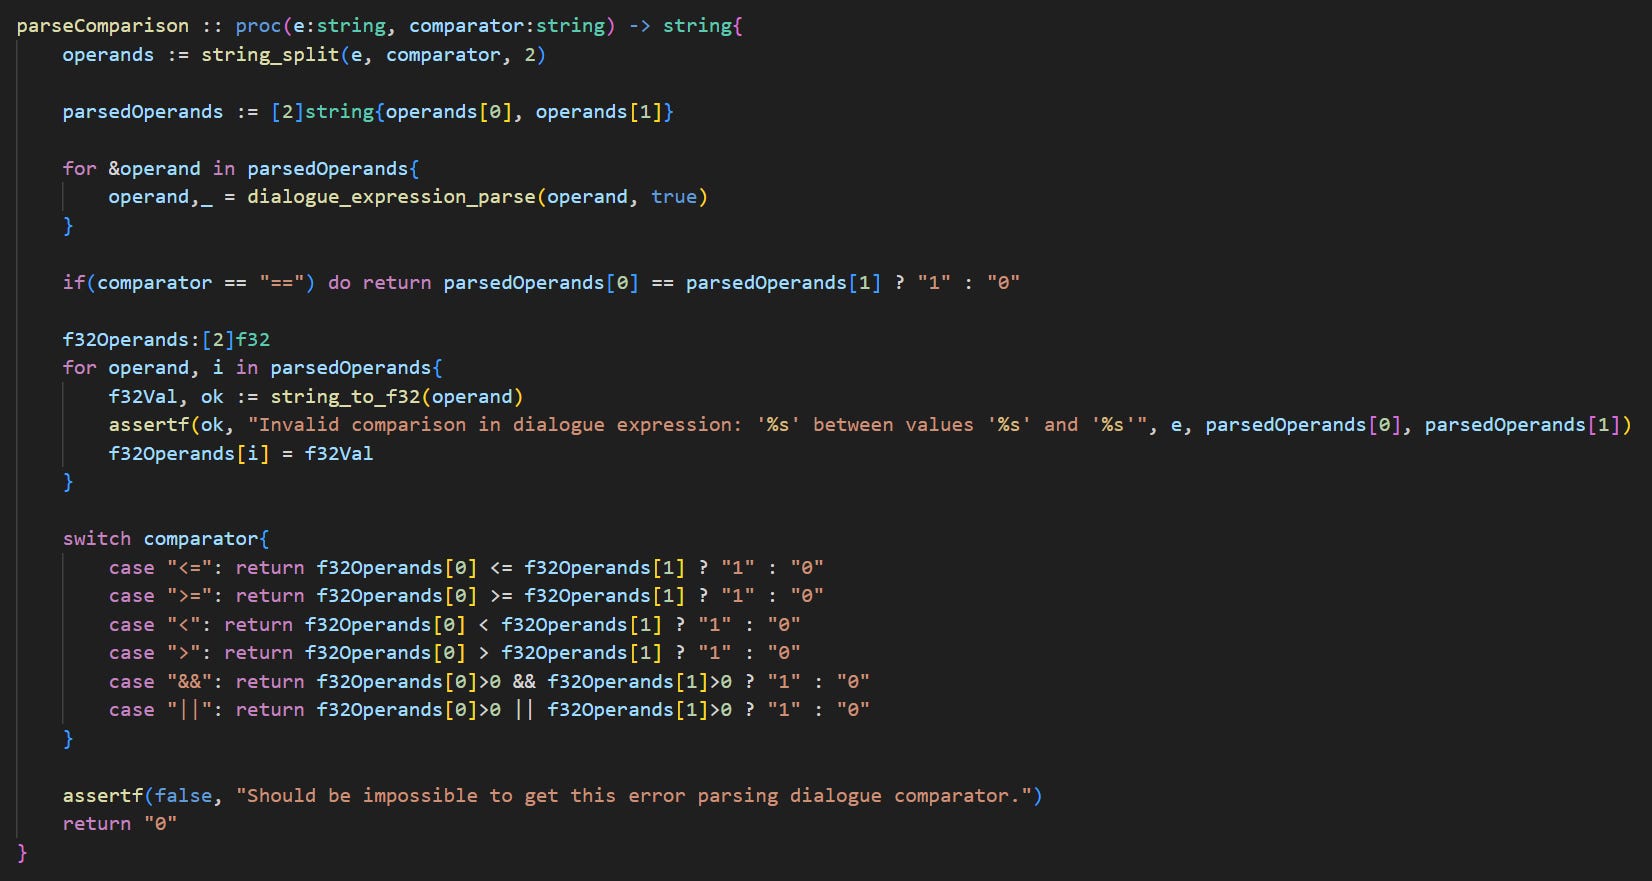
Similarly, after the assignments, the parser handles comparison expressions. For boolean values, it uses the strings “0” and “1”, which get converted to floating point values for comparisons like this.
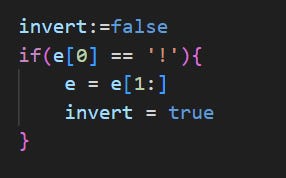
Next, if the expression starts with ‘!’, the parser is set to invert the final output.
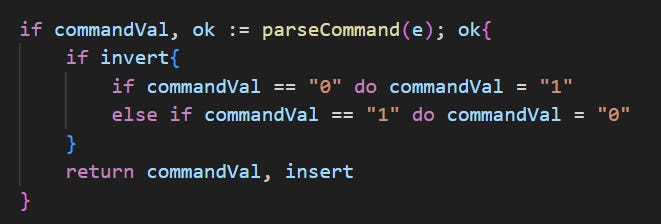
Next, command parsing. The command name and arguments are split by commas.
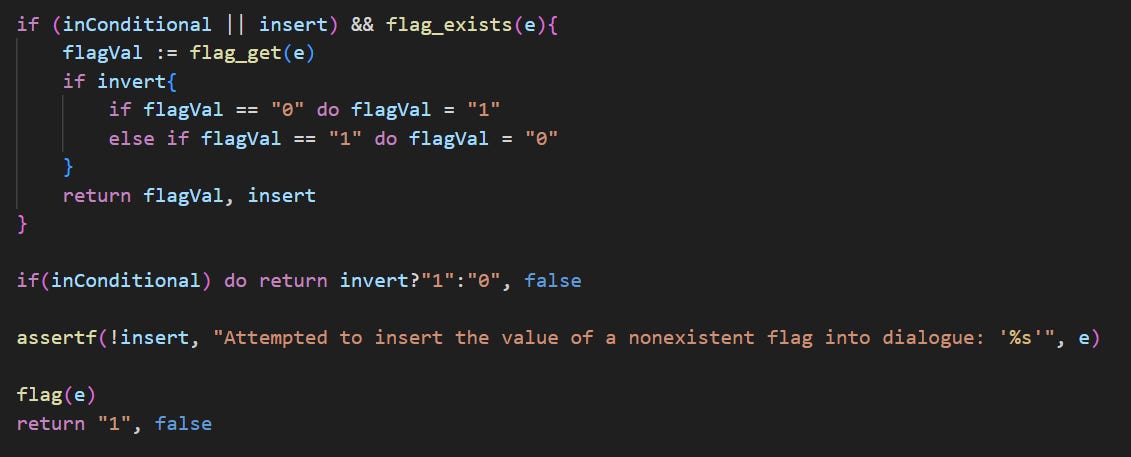
Finally, anything else. At this point, the expression should just be some arbitrary non-numeric string:
If inside a conditional, the parser will check whether a flag with that name exists, and if so return its value. If the flag doesn’t exist, the expression will be treated the same as if it did and was set to false.
If not inside a conditional (and not trying to insert the value of a flag into dialogue), the flag with the same name as the expression will be set to true. This allows me to simply write e.g. `myExampleFlag` in order to set a flag.
Conclusion
Wow! Thanks for getting through the whole thing! Once again, you can check out the latest backer update to vote on the next post’s topic! See you next devlog!
If writing their own solution, and not just using something that works out-of-the-box like RPG Maker.
If you want to see it in action more, you can check out this old demo I uploaded to my Youtube channel.
If you’re wondering about this step, it’s so I can swap in different dialogues, mainly for localization purposes.