
Game Engine Dev, Explained for Non-Programmers: Finale

This series can be read out of order, but here are some navigation links for your convenience:
<<Introduction | <Previous post
Oof, been a while hasn’t it? It’s January now and I wrote the previous two posts I just uploaded alongside this one back in August, didn’t quite have time to put the finishing touches on them before work on Antonblast went crazy, so they languished in my drafts for a bit. Oh yeah, Antonblast, that came out! I’d be surprised of anyone reading this hasn’t seen it already, but in case you didn’t read the first post in this series, my frustrations working in Game Maker on that project was what set me down this path of making my own engine in the first place. And my opinion hasn’t exactly turned around, getting that game ready for a Switch release was a nightmare all on its own (one I might write a bit about in a future post). But anyway, it’s time to put an end to this series, because guess what?
I did it!! Woo!!!
That’s right! As of… uh… roughly September-ish, I finally completed my engine! And just in time too, ‘cause its first game has officially been in full development since December, just as planned! That’s been a real timesink, lemme tell ya, but I felt bad not having finished this series, so before my life is entirely consumed by that project, I’ll run through all the little stuff I missed:
Fonts and text rendering
Frankly, there’s a lot more to this topic than I could write about in 100 posts or that I even know, so I’ll just cover how I handled things for my own purposes.
When building a text rendering system, you might be tempted, as I was, to just load font (.ttf) files alongside your other assets, then use a library like SDL ttf to read those files and render out your fonts whenever you need to draw text. This was unfortunately a misstep that cost me a few days to fix, because doing things this way is slow. Every time I wanted to draw a new character at a given size, the library would have to generate a texture for that single character using the .ttf file data, which I had to send to the GPU whenever I wanted to draw that single character (see the post on sprites to learn why this isn’t great). While most libraries will do some caching to help alleviate this, it will still cause unacceptable lag spikes that one doesn’t have a ton of control over (one frame in testing that had to draw a paragraph of text for the first time all at once took 40 whole milliseconds to render, disgusting).
So, what’s the alternative? While there are definitely ways to make using .ttf files at runtime faster, if you know ahead of time what fonts you’ll need and what size you’ll need them at, it’s better to just cut out the middle man and pre-generate some font texture pages! Just like sprite texture pages, these are large images that have all the characters of a font rendered onto them and packed tightly together, along with an index file that records where each individual character is located in that image. Rather than including the .ttf file in the final game assets, the build process simply reads those .ttf files, generates these pages, only includes them in the actual game. When rendering text, I can then copy the image data from these textures, and just like sprite pages these have the advantage of being able to batch multiple character draws together before having to send new data to the GPU.
In order to make this process possible, each .ttf font should have some kind of attached config data that specifies how it gets converted to a font page (I use little .json files stored in the same folder). This data should look something like this:

Ranges: Specifies which characters I want to actually have on the font page using unicode ranges. Most games won’t really need to display e.g. the ugaritic alphabet, so it’s useful to be able to narrow down the characters I need, to save on texture space. The ranges in the example above correspond to the Japanese hiragana and katakana syllabaries (I’ve made it so my system always exports the basic latin characters no matter what). If you’re confused as to why the numbers at the links don’t match what’s written in the example, that’s because unicode indices (‘code points’) are usually written in hexadecimal. If you convert the numbers into decimal, you’ll see that they match up with the ones I’ve written.
Sizes: What sizes of the font I want to export. Since I can’t read the .ttf file on the fly, the texture data I’m rendering in-game is static, unchanging, so each different size needs to be pre-rendered separately.
Page: Which page to put the font data on. If multiple fonts are often used together, they can be packed together on the same page to make rendering them more efficient.
Collision
This is more of a per-game thing, but I’ll cover a quick solution for collision that can work in a lot of situations.
The basic operation of a collision system is checking whether two shapes are overlapping. In the simplest case, two rectangles (call them A and B), this is done by checking 4 things:
If the x position of the left edge of A less than (i.e. to the left of) the x position of the right edge of B
If the x position of the right edge of A more than the x position of the left edge of B
If the y position of the top edge of A is less than (i.e. above) the bottom edge of B
If the y position of the bottom edge of A is more than the y position of the top edge of B
If all 4 of these things are true, it means the rectangles are overlapping (think about it carefully).
While checking this can be quick, often things get dicey once there are a lot of rectangles to check. Say I’m a rectangle (maybe I’m attached to a player) in a stage with 100 other rectangles (maybe they’re attached to walls, or enemies). To know if I’m overlapping with any of them, I need to check those 4 conditions 100 times! And I might need to do that several times in one frame (for example, if I’m moving, say, 8 pixels this frame, then every pixel I move I need to check all 100 rectangles again to know if I’ve hit a wall and need to stop. In the worst case, that’s 800 checks). And if any of the other rectangles want to do similar collision checking, they have to go through all the others too! 100 rectangles that want to collide with each other means 10000 collision checks!
Ok, calling them ‘rectangles’ is a bit weird, they’re usually called ‘colliders’, since they don’t necessarily have to be rectangles, so I’ll switch to that, but keep in mind that no matter what we’re just checking if two shapes overlap.
Anyway, there are several paths to optimization here, but a simple and easy one is to just narrow down the number of colliders we need to check. If a tiny collider is on one end of a large stage, I know for sure it’s not going to be colliding with another tiny collider all the way on the other end. Knowing this, I can split the stage up into “partitions”, which each has a list of the colliders it contains1. Whenever a rectangle is created or moved, I check if it moved out of a partition or into a new one and register or deregister it with that partition. Then, when doing collision checks with a rectangle, I first check which partitions that collider overlaps, and then only check for collisions with colliders registered to those partitions. If done properly, this cuts down massively on the number of collision checks that need to be done in one frame, great success!
So what about non-rectangle shapes? Different pairs of common shapes will have different “fast” ways of checking overlap, but rectangles are basically always fastest to check, so usually colliders will keep track of their shape as well as a ‘bounding box’, i.e. a rectangle that perfectly encloses the shape. Since most things aren’t overlapping most of the time, when checking for overlap between one or more non-rectangles, overlap between bounding boxes will be checked first, then the more expensive check will be done if and only if the bounding boxes overlap (since we can infer that the enclosed shapes aren’t overlapping if their bounds aren’t). This saves on doing a bunch of expensive checks. But what are those checks?? To be honest, for my purposes rectangles work 90% of the time, so I didn’t bother implementing any other common shapes. The other 10% is covered by “precise” collisions, i.e. irregular shapes, usually ones that conform to the exact shape of a sprite. To check these, I basically brute force it: for every “solid” pixel in shape A, I check if its position matches any solid pixel in shape B. This can be quite expensive, but it will happily handle any weird shape you can draw to a grid, and these sorts of collisions are so rare that it’s not usually a big deal. And if it ever does get to be a problem in a specific case, I can always just devise a more optimal solution for that specific case.
Shaders
Ugh, another topic that people can and have written whole textbooks about. Frankly, I’m not an expert on this, but basically the GPU’s shader is the program it runs which determines how it actually renders out texture data. Custom shaders can be used to produce all sorts of creative visual effects (as well as leverage the GPUs parallelism to do certain kinds of computations), but they’re always written in their own quirky languages due to said parallelism, and are limited in their ability to communicate with your main program.
Initially, these gave me a bit of trouble, since SDL2’s basic rendering backend, which handles making a lot of the more complicated calls to a graphics library such as OpenGL (which is what is ultimately making the CPU talk to the GPU), did not support shaders out of the box. Since I didn’t have the time to properly learn OpenGL and outright replace SDL’s functionality here I was in a bit of a bind. However, I figured out, through a lot of stressful research and trial-and-error, that by forcing SDL to use OpenGL as the rendering backend for its basic renderer you can make some simple calls to OpenGL to set a custom shader before calling SDL’s rendering functions, and the shader will work correctly. Nowhere on the internet is this explained explicitly, so, uh, you heard it here first folks!2
Anyway, once all that was figured out, the rest was just a question of writing some shaders and adding them to the asset system. The sorts of shaders I want to use are few and fairly short, so I can get away with just packing the shader code (i.e. the text of the program, written OpenGL’s shader language, GLSL) in with the rest of my assets, then calling OpenGL when the game starts to compile that code into usable instructions that can be passed on to the GPU when needed.
Again, really not an expert here, I couldn’t yet tell you how half the crazy stuff people do with shaders is done, but getting started using shaders for applying simple effects to 2D textures is not that bad at all.
Each GLSL shader is split into two parts:
The vertex shader, which is only really relevant for 3D because it’s used to mess around with a 3D shape’s vertices, and so in my case will basically always look the same and not do much. If I wanted to deform the rectangle my texture was being drawn to this might be relevant, but usually I don’t.
The fragment shader, which is used to mess around with pixel data by changing the position and value of colors on a texture. You can think the actual function written in it as being run on a single point of the texture (the GPU will run it on as many points as needed to construct each pixel of the final output). This is where the magic happens, by passing in a texture here, sampling it, modifying the sampled color, then passing it on, we can create all sorts of neat effects.3
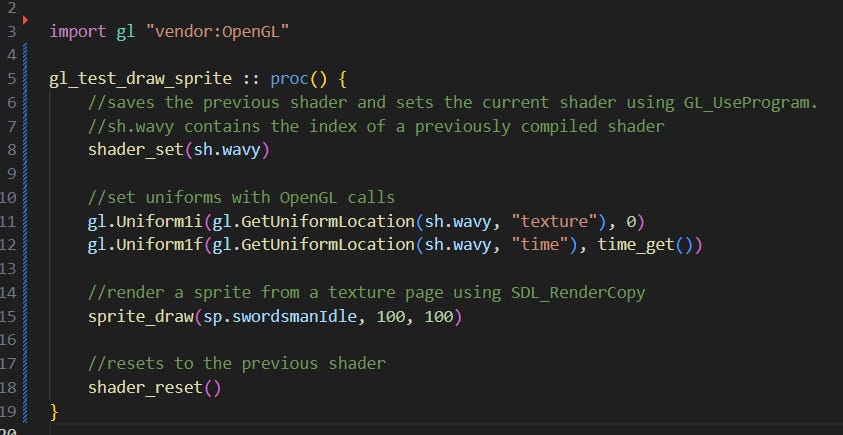
And that pretty much covers it! If you want to get started with these yourself, I’d recommend looking up examples online, but here’s an example of a shader I wrote that creates a simple wavy effect and pulses the texture red:


Serialization
You can think of ‘serialization’ as just a fancy synonym for “saving and loading (usually to a file)”, or, in a dry, useless, technical sense, “converting data into a stream of bytes for transmission or storage”. But it’s worth dissecting the term to understand what it really means: data in computer programs is, underneath it all, just a long string of ones and zeroes. But some of those ones and zeroes are treated as references to other bits of that long string. If I have 100 enemies in my game that all look the same, I don’t want to copy the texture data used to represent those enemies 100 times, what a waste! So instead, in each of the little data structures that hold each enemy’s information like position and speed, I keep a small little number that shows you exactly where to find that enemy’s texture data in some central place in memory. When the rendering system comes along to render that enemy, rather than reading the texture data to pass to the GPU directly from the enemy’s data itself, it follows that little address and gets it from the central place. This is all well and good, but now let’s say I want to save all of that enemy’s information to a file, so that I can load it up later. I tuck all the little numbers in the enemy’s little data structure into a little binary file and back it up to the cloud.
Flash forward 70 years. I am old. Too old. My only remaining shot at joy in life is to see that little enemy again. I pull the enemy’s file down from the hypercloud. Tell me dear reader, using only that file, will I be able to draw that enemy again…? No! Sure, I’ll know where that enemy was and how fast it was going, those are just numbers, stored safely in the file. But that little address that showed me where to get the texture data? It points to nothing. The RAM that held that texture data turned to ash long ago. Despair overtakes me, I will never see my enemy again.
This is what it really means for data to be “serializable” or not. If you can reconstruct all the relevant information a block of data is meant to represent by reading through that block alone, a.k.a. that serial string of ones and zeroes, then we can say that any data that can be turned into such a block is serializable. Conversely, data that isn’t serializable is data which points to outside information using addresses whose validity won’t outlive the data itself. Note that there’s a bit of fuzziness here. If I had loaded the enemy file right after saving it, without closing the program, the address pointing to the texture would still have worked (assuming the program didn’t move the texture data somewhere else for whatever reason). If I never intend to keep enemy files around for longer than the lifetime of the program, then I will always know how to interpret the texture address properly, and the enemy data is, in a limited sense, serializable.
Anyway, as you may have guessed, serialization comes into play when saving and loading the player’s progress, as well as when editing data that will get turned into loadable asset files such as stages or cutscenes. The exact details of how one goes about serializing this sort of data radically depends on the details of a specific game, but it’s important to think about how your data is laid out and to be able to quickly recognize what can and can’t be easily serialized.
Stages
A stage system is something that is genuinely so game-dependent that it’s tough to describe in detail. But broadly speaking, stage systems will look something like this:
Stage data is saved to a file in a format your engine can interpret (i.e. deserialize).
These files are edited using and external editor such as Tiled or LDTk, or in-engine using a custom-built level editor. On my current project, I built an editor that can edit entities and a few other things like image and tileset layers directly. When saving, the editor reads only the relevent information from the game state and serializes it to a stage file.
When loading a stage, existing entities and other non-persistent stage elements are cleared, and new ones are created using information from the stage file.
Particles
Gonna be honest, haven’t gotten around to actually building this yet as of writing this. But in principle, this is just a very efficient sprite system that sacrifices versatility and control over individual sprites in order to quickly be able to draw a huge amount of sprites at once. The difference is related to sorts of considerations that come up in Data-oriented design, something I touched on in the post on entities. Basically, the plan when building a particle system is to pack all the information your particles will need in order to be rendered (stuff like position, speed, spin, and texture information) as conservatively as possible into one dense array (it’s worth looking up other particle systems to get an idea of the kind of variables they use to create effects). You can then churn through this data very quickly, updating and rendering each particle without needing to retrieve data from elsewhere.
Other tips and tricks
A debug console you can call up at anytime is an invaluable tool, and worth building. At its simplest this is just a textbox where you can type in predefined commands which will call custom functions, but adding features yourself such as a history, autocomplete, command arguments, and a visible output is not as daunting as you might think. I use the dear imgui library to build in-engine development tools like this, and it’s quite pleasant to work with.
Similarly, learning how to set up and use a profiler is not that hard and is indispensable when it comes to evaluating your code’s performance, and for a language manually managed memory like ODIN it’s immensely useful for making sure your program isn’t leaking memory (i.e. requesting memory without properly cleaning it up when its done, an error which will eventually balloon your program’s RAM consumption and crash it). I recommend Tracy, ODIN bindings can be found here.
Tilesets should just be a small extension to the existing sprite system. Define a structure that “wraps” a sprite with a additional information such as tile size and padding. You can then build functionality that takes that structure as well as a given “tile index” and draws the relevant part of the sprite, i.e. the tile at the given index.
Regularly testing your engine on platforms you plan to support is a good way to catch bugs early and ensure you aren’t swamped tracking down errors in code you wrote months ago when it’s finally time to publish. Personally, I have not been keeping up with this, and am therefore screwed.
When working in ODIN and using a dynamically linked library, remember to include the library file with your final executable (.dll files on windows). Unlike a pure ODIN package, ODIN bindings just tell your program how to call a library, but if you don’t include the library itself alongside your .exe your program will fail when it tries to call the library and finds nothing. This does not apply to statically linked libraries (.lib on windows), which will be built into your .exe when compiling.
Slightly related to the above point, you can take advantage of .dlls to reload the majority of your engine’s code while it’s running, giving you the ability to change functionality without needing to close and reopen your program, which can help a lot with iterative testing. The exact details of this are too technical to cover in this series, but I’d recommend checking out this repository for details.
Grand Conclusion
And there you have it! Thanks a lot for reading, to those who have or are planning to build their own engine I hope this helped make it all seem more approachable, looking back over those 6-ish months of work, it really does seem like modern languages like ODIN have made learning and doing proper low-level game development more accessible than ever before, even on a tight schedule like mine. And for those non-programmers this series is ostensibly aimed at, I hope this demystified a lot of what goes on under the hood of your favorite games and gave you a richer understanding of the medium.
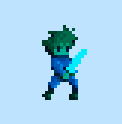
And for those who are maybe on the fence about jumping into this kind of development, I really hope this gave you the push you needed to give it a shot. While I wouldn’t recommend it to a complete beginner, it’s clear to me now that building an engine like this isn’t the crazy multi-year ordeal some make it out to be, and that it should be a natural step on every game programmer’s journey. Especially for those developing 2D commercial projects, having to deal with a third-party engine can end up being far more trouble in the long run, and building your own foundation in a data-oriented way will result in a happier development experience and better software for your players. And best part is, you can do stuff like this:

Onto the next thing
Alright, I’m off to have my life entirely consumed by that project. See you soon!

<<Introduction | <Previous post
There are lots of complicated ways of divvying up a stage into partitions, but the simplest one is to just pick a size and split the stage up into big squares of that size.
I believe this functionality has gotten much much better in the recently released SDL3, but at the time I was figuring this out I had no idea when it would be ready so was stuck with SDL2. Still, this is all kinda moot now, but if you want to know the details please comment below.
Annoyingly, since GPUs fundamentally work with stretchable triangles, they don’t really have an easy way to work with textures as fixed grids of pixels, so I often have to pass in information about a texture’s pixel size to get certain effects working properly. An easy example of this: say I want to make a shader that shifts everything in a texture to the right by a certain fixed pixel amount when drawing it. If I don’t know how big the texture is in pixels, I can only shift it to the right by, e.g. 30% of its size. This means larger textures would get shifted more in absolute pixel terms than smaller textures.